.png)

Selling products online is more competitive than ever, and Facebook remains one of the most effective platforms to reach your audience. With billions of active users and advanced targeting options, Facebook ads enable creators, entrepreneurs, and businesses to showcase their business offerings directly to the people most likely to buy.
While scrolling through Facebook or Instagram, you’ve probably noticed ads popping up between posts, Stories, or Reels. But those aren’t random; they’re targeted campaigns businesses use to reach people just like you. And the reason they’re everywhere is simple: Facebook ads improve reach.
Facebook, through the Meta Ads Manager, gives businesses of all sizes the ability to target the right audience with precision. Whether you aim to drive traffic, boost sales, or generate leads, you can create a campaign tailored to your specific goals.
This step-by-step guide will walk you through exactly how to run Facebook ads in 2025, from setup to monitoring, so you can launch campaigns that convert.
What Are Facebook Ads?
Facebook ads are paid promotions that businesses create to reach specific audiences across Facebook, Instagram, Messenger, and the Audience Network— Meta’s group of partner apps and websites. This means your ads aren’t limited to Meta platforms alone; they can also appear in mobile apps or news sites outside of Facebook that are part of Meta’s advertising network.
Unlike regular posts, which only reach your followers (and maybe a few friends through shares), ads are designed to target people based on their demographics, interests, and behavior, giving you a much wider and more precise reach.
Boosted Posts vs. Facebook Ad Campaigns
It’s important to understand the difference between a boosted post and a full Facebook ad campaign, because while they may look similar, they serve very different purposes:
Boosted Post
This is achieved when you take an existing post from your page and pay Meta to show it to a larger audience. It’s a quick and simple way to increase visibility, but it offers limited control over who sees the post, where it appears, and what specific outcome you’re optimizing for.
Facebook Ad Campaign (via Ads Manager)
This gives you full control over your advertising strategy. With a Facebook ad campaign, you can choose exactly what you want to achieve (like driving sales, getting leads, or boosting website traffic), define your audience in detail, set your budget and schedule, decide where your ads will appear, and even test multiple versions of the same ad to see which performs best. This flexibility makes Ads Manager the recommended option for running serious, goal-driven campaigns.
Ultimately, whether you’re running a single ad or a full campaign, everything is managed through Meta Ads Manager, the centralized hub where all ads are created, managed, and optimized. It’s also a tool you’ll need to master to get consistent results. Now that you know what Facebook ads are, it’s important to understand why they are powerful tools for growing your business.
Benefits of Advertising Your Business on Facebook
Advertising on Facebook offers clear advantages for businesses of any size, and three of the most important are:
- Precise targeting: Meta’s ad tools let you reach people based on age, location, interests, behaviors, or even custom lists. This makes it easier to connect with the right audience instead of wasting spend on those unlikely to care about your offer.
- Flexible budgets with measurable results. You can start with a small daily budget, test different ads to see which ones perform better, and then increase your budget on the ads that bring the best results. Ads Manager also makes tracking your Facebook ads budget simple by showing exactly what you’re spending and what you’re getting in return in real time.
- Multiple ad formats to match your goals. Facebook ads can appear as videos, single images, or carousels. You can also run ads that include a simple form, where people quickly share their name or email without leaving Facebook. This way, you get different tools to either grab attention, showcase products, or collect customer details depending on what matters most for your business.
How to Run Ads on Facebook Ads (Step-by-step)
Getting started with Facebook ads might feel overwhelming at first, but Meta Ads Manager makes the process a lot more structured. By following a step-by-step approach, you can go from setting up your account to launching your first ad without missing anything important. Here’s a simple breakdown of how to run ads on Facebook.
Step 1: Set Up Meta Business & Ads Manager
Before you can create digital product ads, you need the right setup.
1. Create a Meta Business Manager Account
- Go to business.facebook.com.
- Sign in with your Facebook account and set up a free Meta Business Manager account.
- This gives you professional tools to manage ads, pages, and assets in one place.
2. Create a Facebook Business Page
Ads cannot be run from personal profiles. You’ll need a business page.
- Go to your Facebook homepage, click Pages, and create one if you don’t have one already.
- Choose a business name, category (e.g., “Education” for digital courses), and complete your page details.
3. Add Payment Information
- In Business Manager, navigate to Business Settings > Payments.
- Add your credit card, PayPal, or other payment method.
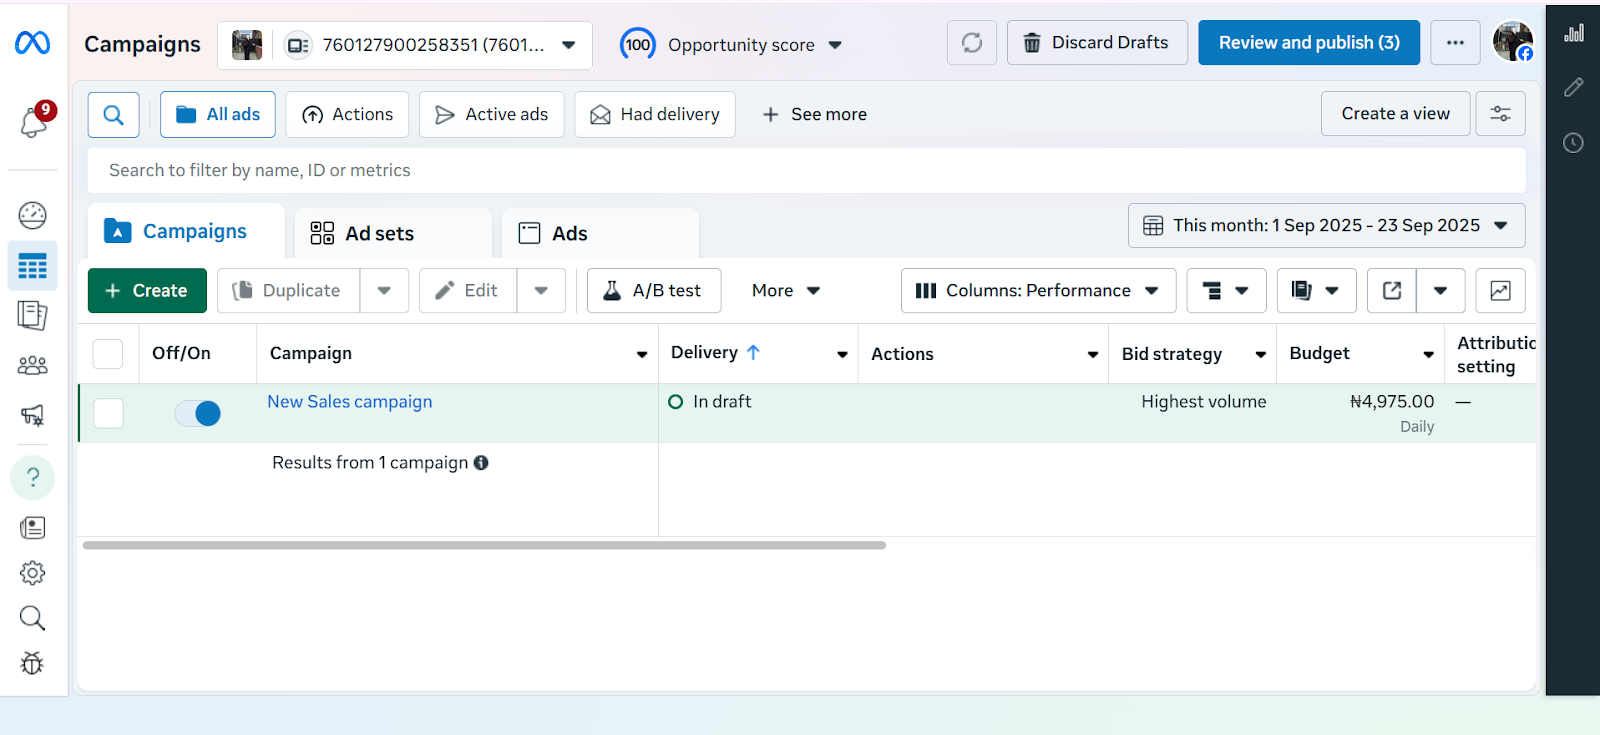
Step 2: Create Your Campaign in Ads Manager
Once your foundation is ready, it’s time to build your campaign.
1. Go to Ads Manager
- Inside Business Manager, click All Tools > Ads Manager.
- This is the hub for creating, managing, and monitoring ads.
2. Click “+ Create”
- Hit the green + Create button to start a new campaign.
Step 3: Choose Your Objective
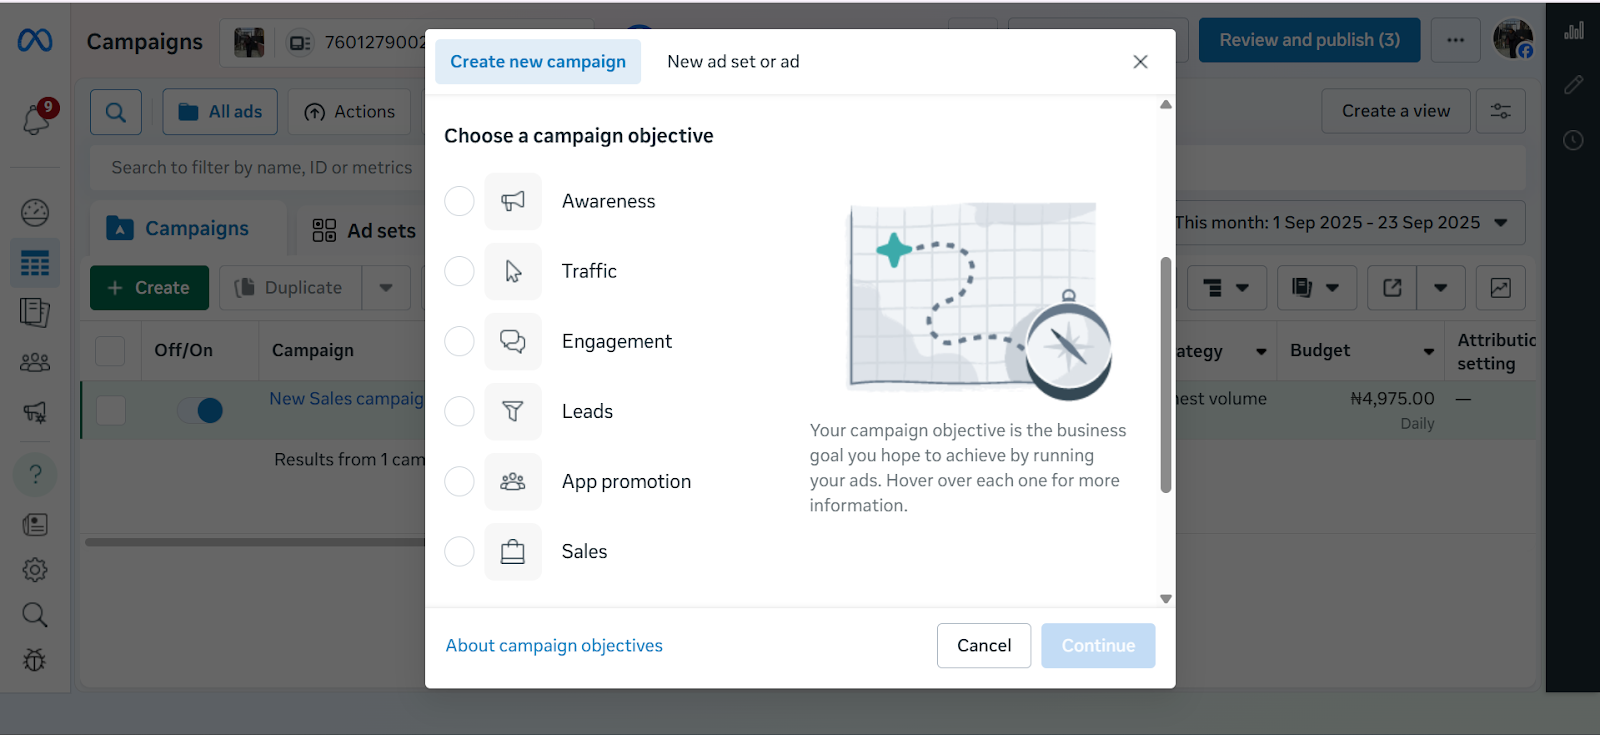
When creating a campaign in Meta Ads Manager, the first step is choosing your advertising objective which is the main thing you want your ad to achieve. Meta currently offers six objectives:
Awareness – Best for getting your brand in front of as many people as possible. Useful if you’re just starting out or launching something new.
Traffic – Drives people to a website, landing page, or app. Helpful if you want more visits to your online store or product page.
Engagement – Encourages actions like likes, comments, shares, or event responses, making it easier to build a community around your brand.
Leads – Collects contact details (like emails or phone numbers) directly through Facebook forms or your own landing page.
App Promotion – Helps you get more people to download or use your mobile app.
Sales – Optimises your ads to drive actual purchases, either on your website, in your app, or directly through Facebook and Instagram Shops. Meta does this by showing your ads to people most likely to buy based on their past activity, e.g., clicking “add to cart” or completing a purchase. You can also connect your product catalogue so your ads automatically display items in stock, making it easier for customers to shop directly.
Step 4: Name Your Campaign
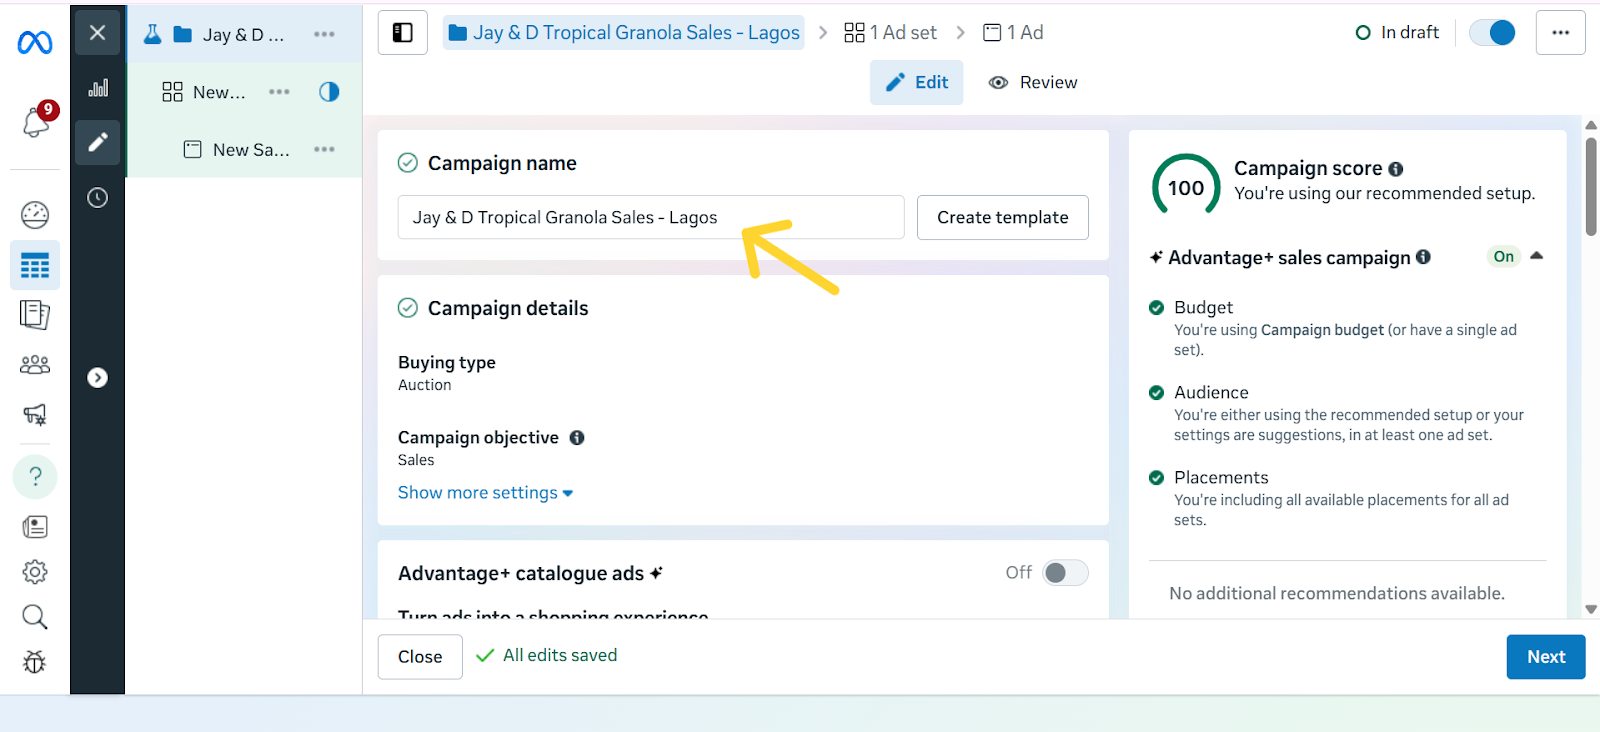
Give your campaign a clear, descriptive name so you can easily identify it later. A good rule of thumb is to include the product, audience, and goal in the name. For example: “Tropical Granola – Abuja – Traffic” or “Ebook Launch – US – Sales.” This makes it easier to stay organised, especially once you start running multiple campaigns at the same time.
Step 5: Set Your Budget & Schedule
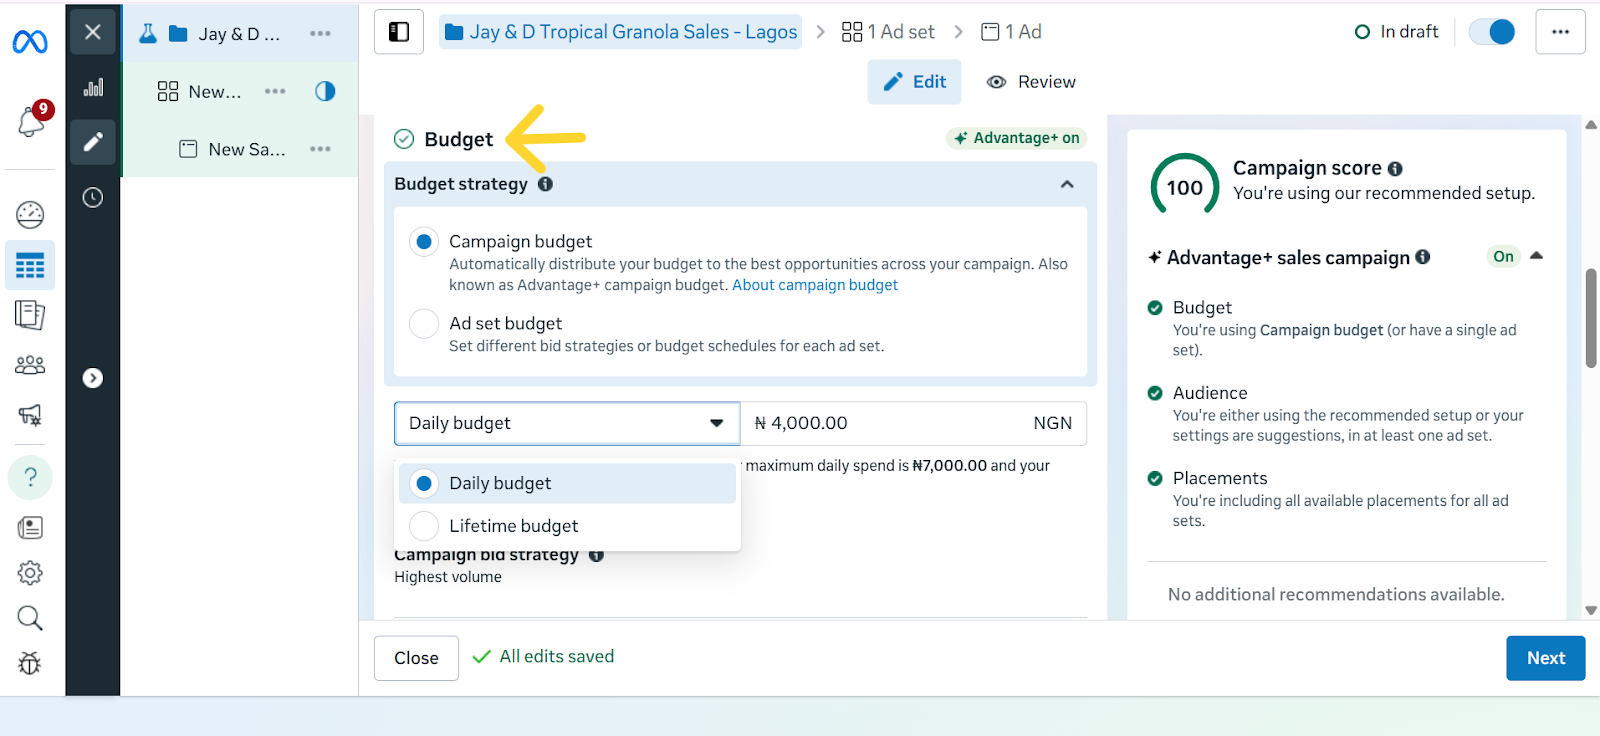
Your budget decides how much you want to spend on your ads, while your schedule controls when your ads run. In Meta Ads Manager, you’ll see two main types of budgets:
- Daily budget – This is how much you want to spend per day. For example, setting ₦2,500/day for 7 days means Meta will try to spend around ₦2,500 each day while getting you the best results possible.
- Lifetime budget – This is the total amount you want to spend over the entire campaign. For example, if you set a lifetime budget of ₦15,000 for 7 days, Meta will spread that amount across the week, sometimes spending more on one day and less on another, depending on performance.
Pro-tips for Cost Control:
- Set a bid cap – A bid cap lets you tell Meta the maximum amount you’re willing to pay for a result (like a click or a lead). This ensures you don’t waste money on overly expensive results.
- Start small, then increase – Begin with a modest daily spend and raise it only if the ad is performing well.
- Use a clear schedule – Don’t run ads endlessly. Set start and end dates so your budget doesn’t drain without you noticing.
- Take Advantage of the Cost per Result Goal Setting - This setting tells Meta the maximum you’re willing to pay for the outcome you want. For example, if your goal is sales, you could set a limit like “Don’t spend more than ₦1,000 to get one purchase.” If your goal is awareness, you might say, “Keep the cost of reaching 1,000 people under ₦500.”
This way, Meta runs your ads but won’t go beyond the budget you’ve set for each result, helping you stay in control of your spending.
The caveat here, however, is that if your target cost is set unrealistically low, Meta may struggle to deliver your ads, or you may get fewer results. So it’s best used when you already have some data on what a “reasonable” cost per result looks like for your business.
- ROAS Goal (Return on Ad Spend) – This is a more advanced option. Instead of focusing on cost per action, you’re asking Meta to prioritise sales that give you a specific return. For example, if you set a ROAS goal of 3.0, you’re telling Meta, “Only spend my budget on people who are likely to generate at least ₦3,000 in sales for every ₦1,000 I spend.”
Note: This works best if you’ve set up the Meta Pixel or Conversions API so Meta can track actual purchases.
Together, these options help you avoid overspending and make sure your money is going toward results that matter most to your business.
Step 6: Choose Your Target Audience
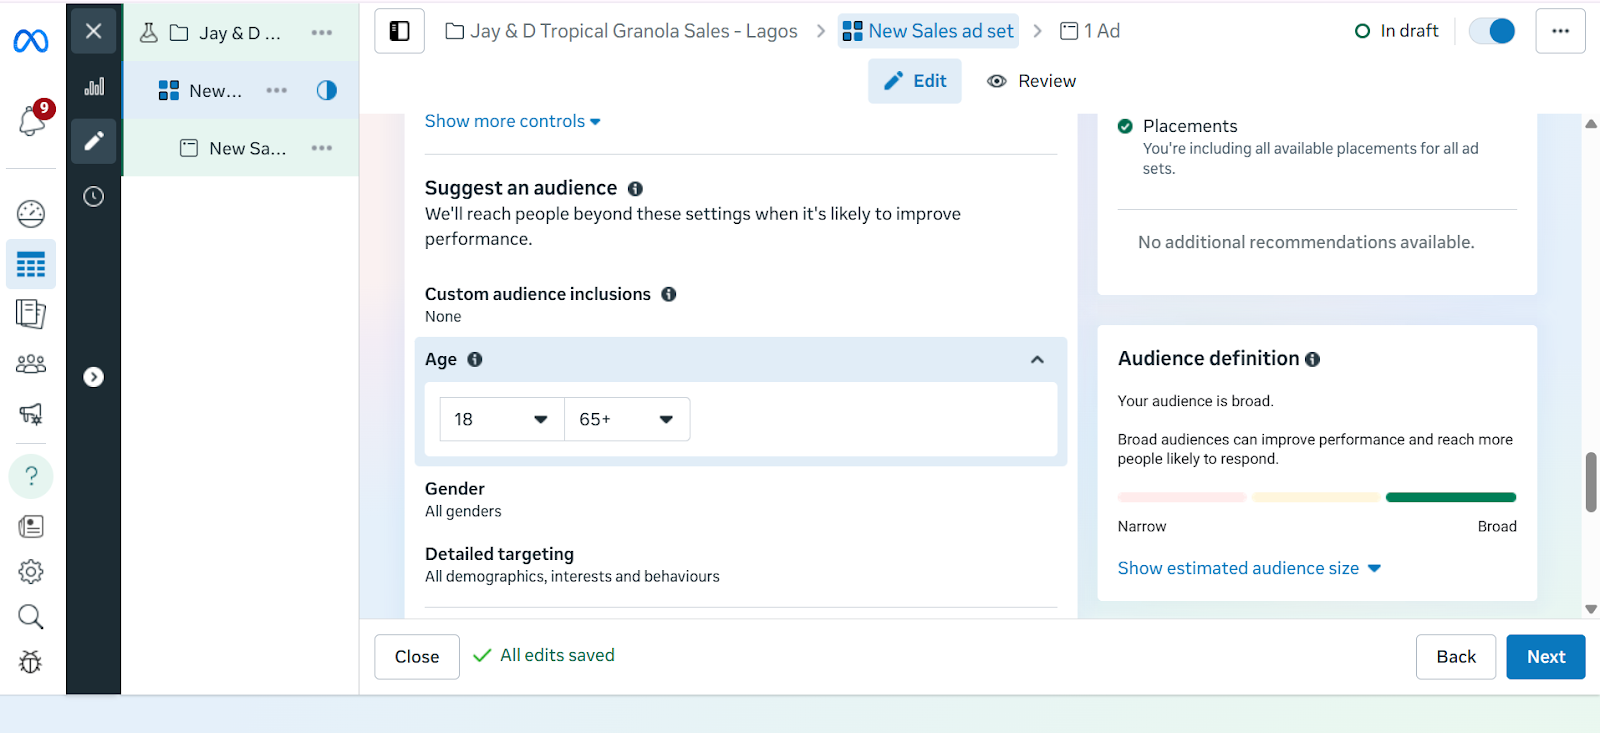
This is where you tell Meta exactly who should see your ads. Instead of showing your ad to everyone, you can narrow it down to people who are most likely to buy from you.
With Meta Ads Manager, you have three main options:
- Core Audiences – With core audiences, you set the filters yourself. This means you tell Meta exactly the kind of people you want your ad to reach. Instead of showing your ad to just anyone, you narrow it down based on details such as age, gender, location, language, or interests.
- Custom Audiences – Custom audiences let you reach people who already have a connection with your business. This could be past customers whose emails you upload into Meta Ads Manager, visitors who came to your website but didn’t complete a purchase, or even people who interacted with your Instagram or Facebook content. Instead of starting fresh with strangers, you’re reminding people who already know your brand to come back and take the next step, which usually makes them easier to convert.
- Lookalike Audiences – Once you have a Custom Audience, Meta can find new people who share similar traits. For example, if your best customers are young professionals in Lagos, Meta can look for more people just like them in Nigeria.
While targeting with Meta Ads Manager makes it easier to reach the right people, recent privacy changes, especially Apple’s iOS updates, have made it harder to track every action users take across apps and websites. This means targeting isn’t always perfect, but it still gives you a more direct connection to your audience. The key is to test different audience types and focus on the ones that deliver the best results for your business.
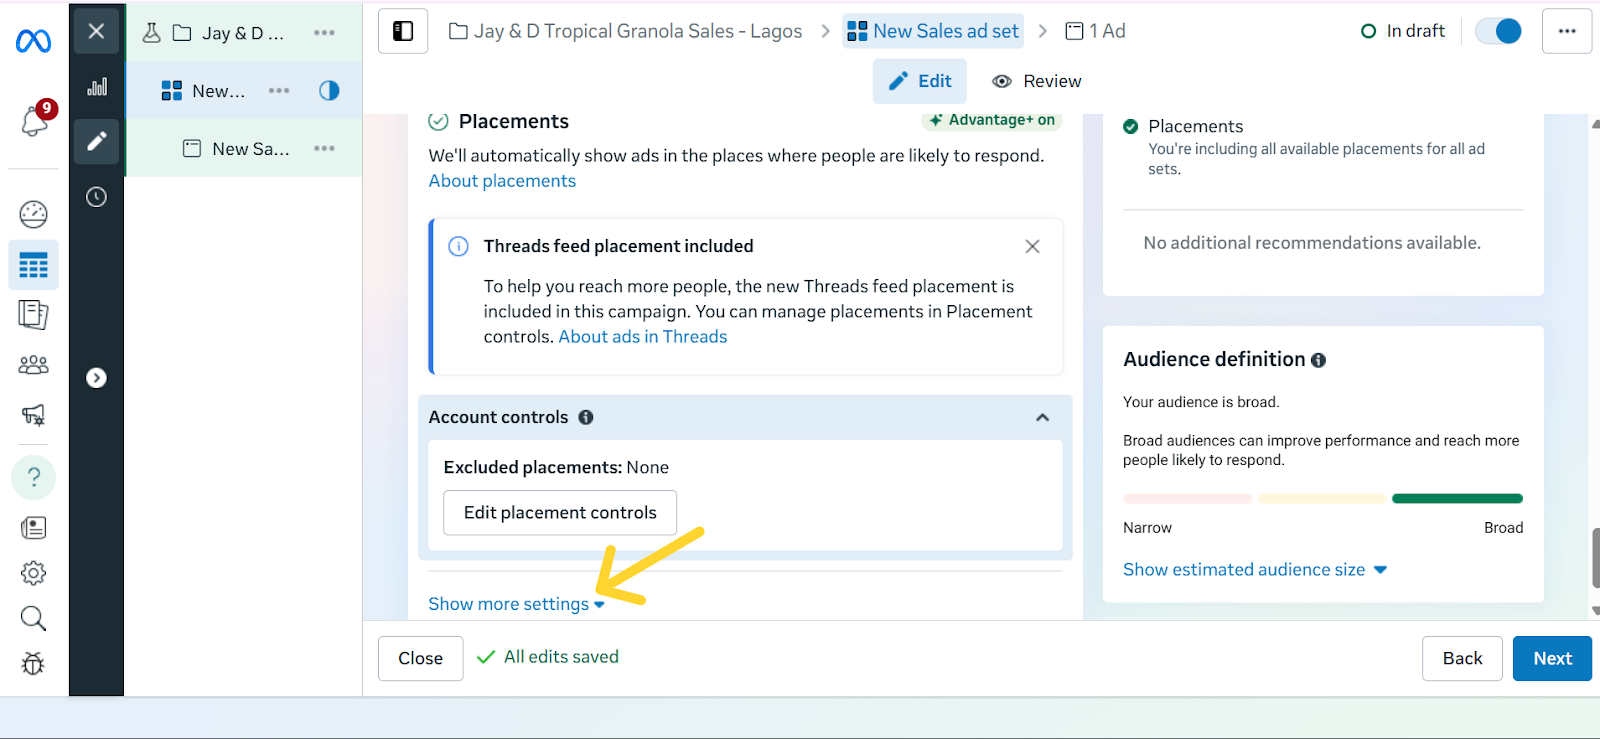
Step 7: Select Ad Placements
Placements are the different spots where your ad can show up across Meta’s platforms. This could be in the Facebook News Feed, Instagram Stories, Reels, Messenger, or even inside partner apps and websites. By default, Meta recommends Advantage+ Placements, which automatically shows your ad in multiple places and then prioritises the ones that perform best.
For beginners, this is often the easiest option because Meta does the testing for you. However, if you want more control, you can manually choose placements, for example, focusing only on Instagram Reels if your audience skews younger, or Messenger if you want a more personal approach.
Each placement has its strengths:
- Feed: Ads appear in the main scrolling section of Facebook or Instagram and are great for longer captions, links, and detailed storytelling.
- Stories: These are full-screen, vertical ads that stay up for 24 hours. They work best for quick, eye-catching visuals because they blend naturally into how people already swipe through Stories.
- Reels: These ads appear as short-form video content when people scroll from one Reel to the next on Instagram or Facebook. They look and feel like regular Reels, except they’re sponsored, so they blend naturally into the viewing experience. This makes them a good way to reach people while they’re actively browsing short videos and open to discovering something new.
- Messenger: Ads placed in the Messenger app, where conversations happen. Best suited for businesses that want a more personal approach or direct engagement.
The real advantage of placements is flexibility: you can either let Meta spread your ad widely and optimise for results, or zero in on the exact spots where your audience is most active.
Step 8: Design Your Facebook Ad Creative
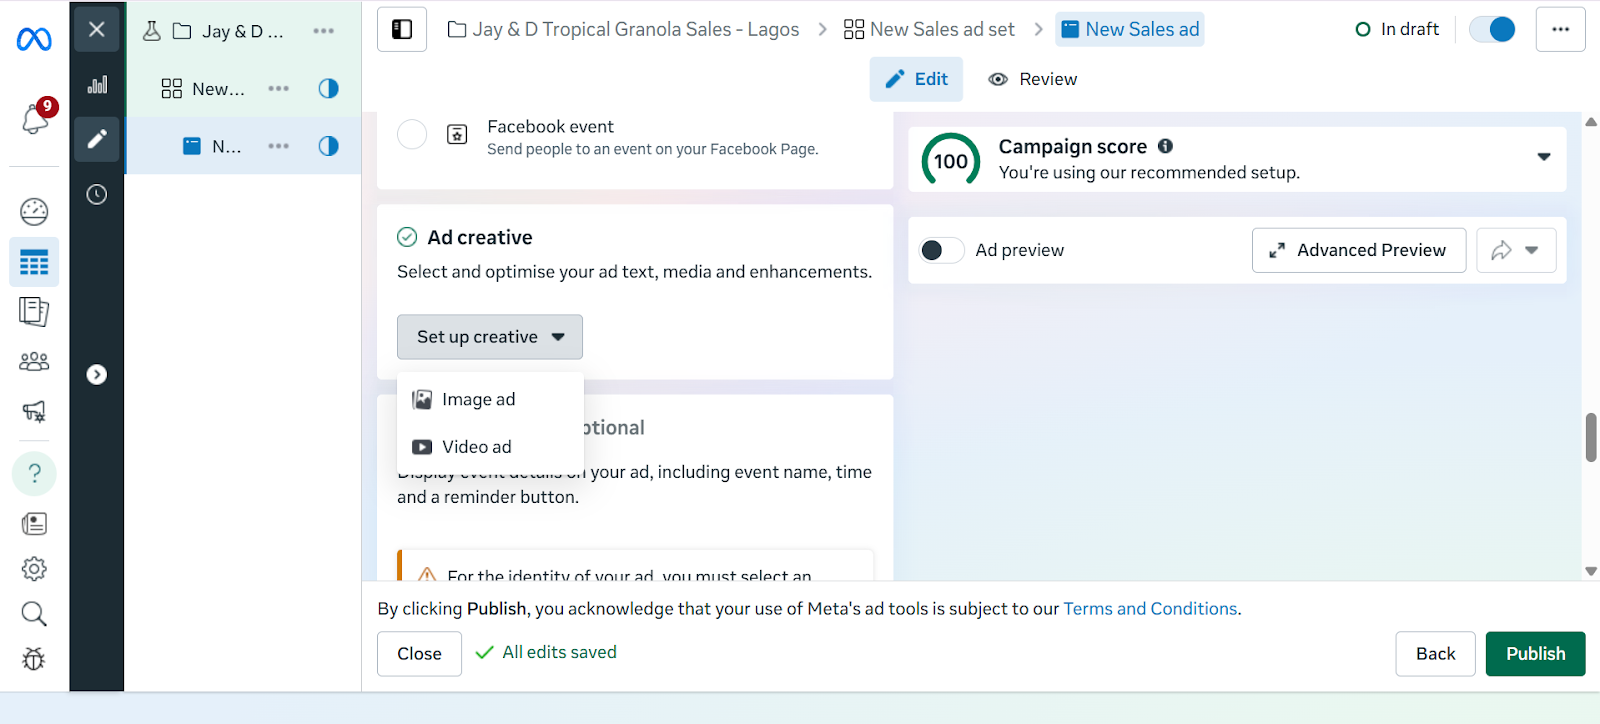
An ad creative, simply put, is the actual content of your ad. That is, the picture, video, headline, and caption people will see when your ad shows up on their Facebook or Instagram feed. A strong creative can be the difference between someone scrolling past or stopping to pay attention.
To make yours effective, let’s break it down into the key parts so you know exactly what to focus on.
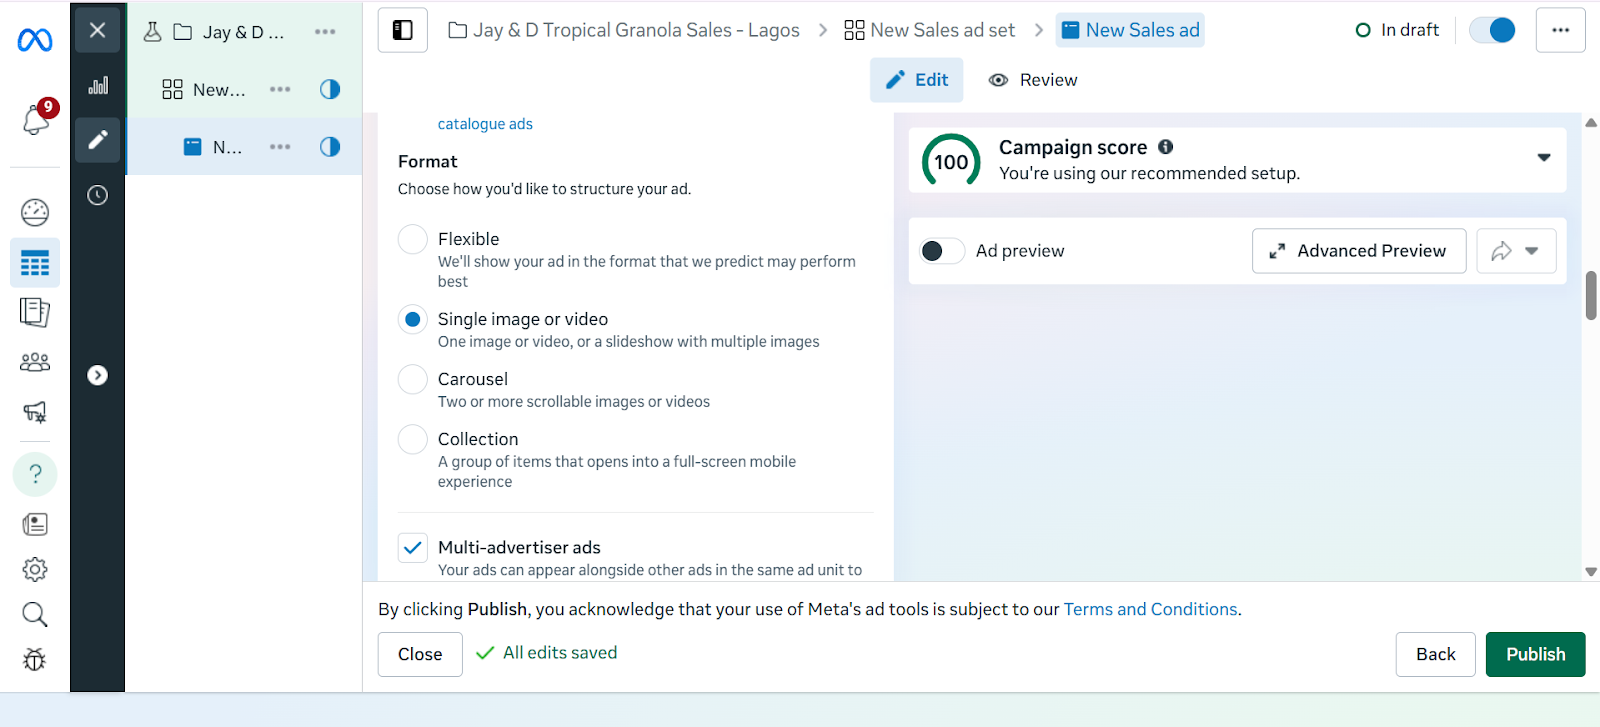
Select Ad Format
- Single Image – Great for a single product.
- Video – Best for demos or storytelling.
- Carousel – Multiple images, perfect for bundles or multiple products.
Visuals
- Use high-quality images or videos.
- Showcase the product clearly (e.g., mockups of your eBook, a demo of your software).
Copywriting Tips
- Primary Text: Keep it short, benefit-driven, and engaging.
- Headline: Bold and attention-grabbing.
- Description: Extra context if needed.
Call-to-Action (CTA)
- Examples: “Shop Now,” “Download,” “Get Started,” “Learn More.”
- Always link directly to your product page or sales funnel.
Best Practices for High-Performing Facebook Ad Creatives
- Use bold visuals: Bright colours, high contrast, and eye-catching images or videos grab attention quickly.
- Keep it short: Captions should be concise and to the point. Aim for one clear message.
- Add a clear CTA (Call-to-Action): Examples include “Shop Now,” “Sign Up,” “Learn More.” Don’t assume people will know what to do.
- Follow the 20% text rule: Facebook performs best when text on your image is minimal — less than 20% of the total space.
- Match creative to your goal: If you’re selling, show the product in use. If you’re building awareness, focus on brand storytelling.
Step 9: Review and Publish
Before you hit “Publish,” it’s important to double-check your ad. Meta has strict ad policies, and if your ad doesn’t follow the rules, it can be rejected or even get your account flagged.
Things to check before publishing:
- Ad content: Avoid misleading claims, exaggerated promises, or offensive language.
- Images and videos: Don’t use shocking visuals or content that suggests unrealistic results.
- Targeting: Make sure your audience choices don’t discriminate based on personal traits like race, religion, or health conditions.
- Links: Test that your link works and takes people exactly where you promise in the ad.
Common reasons ads get rejected:
- Promoting restricted or illegal items
- Adult content
- Poor landing pages
Once everything looks good, click Publish. Meta will then review your ad, which usually takes a few minutes to 24 hours. If approved, your ad will go live and start delivering to your chosen audience.
Step 10: Monitor & Optimise Performance
In Ads Manager, track key metrics to understand how your campaigns are performing:
- Click Through Rate (CTR): This measures the percentage of people who saw your ad and actually clicked on it. A higher CTR usually means your ad copy, creative, or targeting is resonating with your audience.
- Cost Per Click (CPC): This tells you how much you are paying on average for each click on your ad. Lower CPC means you are driving traffic more cost-effectively.
- Conversions and Sales: This tracks how many people took a desired action after clicking your ad, such as signing up, purchasing, or downloading. It shows the real business impact of your campaigns.
- Return on Ad Spend (ROAS): Compares how much money you made from your ads versus how much you spent. If you spent ₦10,000 and earned ₦40,000 in sales, your ROAS is 4x.
Optimize Ads
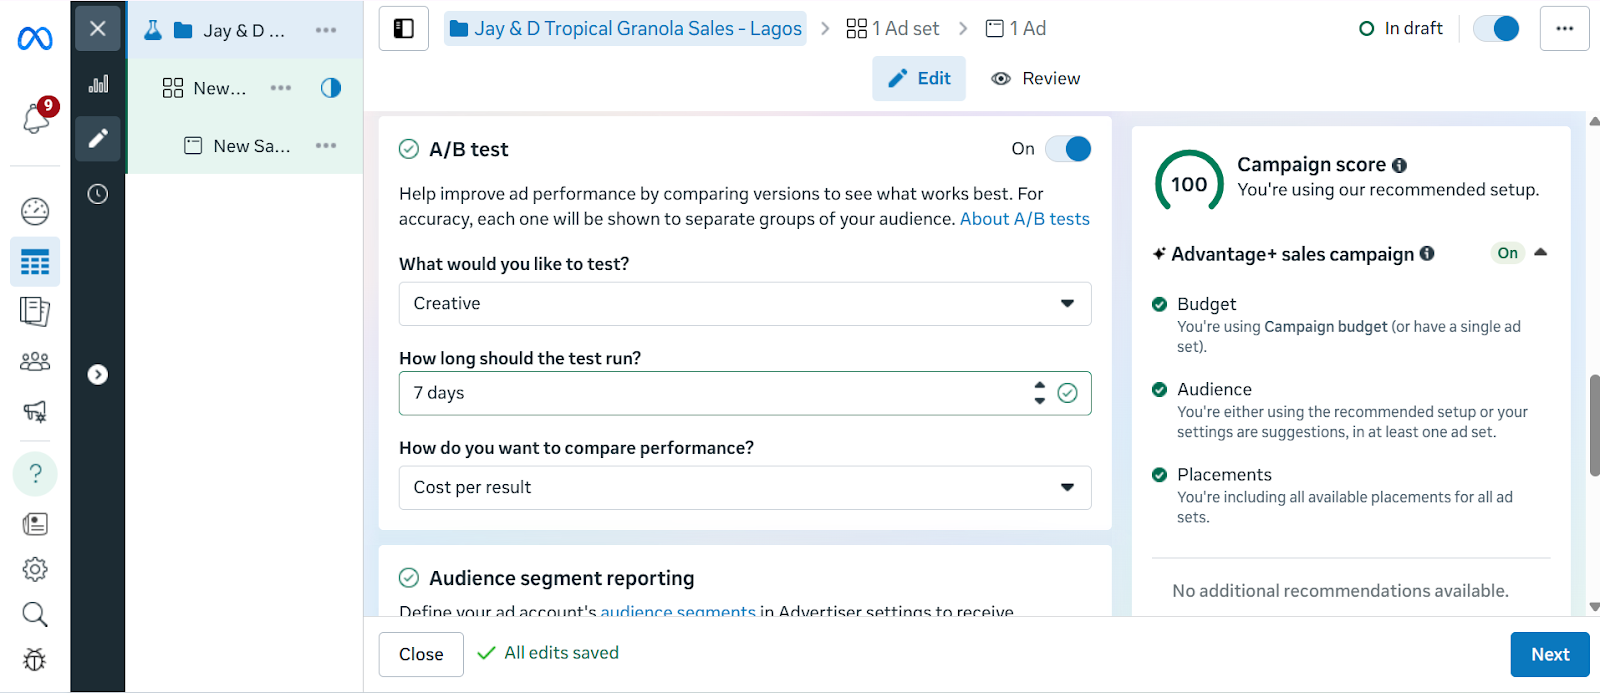
- Test different versions of your ad (A/B testing): Try running two or more versions of the same ad with slight differences. For example, a different image, headline, or CTA. This helps you figure out what your audience responds to best.
- Adjust your audience if results are weak.
- Increase budget on winning ads, pause underperforming ones.
Running Facebook ads in 2025 is only part of the journey. Turning clicks into sales or meaningful engagement requires the right destination for your audience. With Mainstack, you can create tailored landing pages or online storefronts that act as the perfect extension of your ad campaigns. Every click from your Facebook ad can lead to pages specifically designed to showcase your products, collect leads, or drive purchases directly.
By pairing the precise targeting of Facebook Ads with Mainstack’s easy-to-use tools, you create a system where ads, pages, and customer actions work together, making it easier to track results, optimise campaigns, and grow your business efficiently.
Start building pages that connect directly to your ads today and see how a well-designed destination can turn impressions into measurable growth.
Facebook Ads Campaign Checklist
At this point, you’ve learned how to set up, target, and create effective Facebook ads and how to ensure every click leads to a page that converts impressions to sales. But, to make it even easier, we’ve put together a step-by-step checklist you can follow every time you run a campaign.
Step 1: Set Up Meta Business & Ads Manager
Step 2: Create Your Campaign in Ads Manager
Step 3: Choose Your Objective
Step 4: Name Your Campaign
Step 5: Set Your Budget & Schedule
Step 6: Choose Your Target Audience
Step 7: Select Ad Placements
Step 8: Design Your Facebook Ad Creative
Step 9: Review and Publish
Step 10: Monitor & Optimise Performance
Selling products online is more competitive than ever, and Facebook remains one of the most effective platforms to reach your audience. With billions of active users and advanced targeting options, Facebook ads enable creators, entrepreneurs, and businesses to showcase their business offerings directly to the people most likely to buy.
While scrolling through Facebook or Instagram, you’ve probably noticed ads popping up between posts, Stories, or Reels. But those aren’t random; they’re targeted campaigns businesses use to reach people just like you. And the reason they’re everywhere is simple: Facebook ads improve reach.
Facebook, through the Meta Ads Manager, gives businesses of all sizes the ability to target the right audience with precision. Whether you aim to drive traffic, boost sales, or generate leads, you can create a campaign tailored to your specific goals.
This step-by-step guide will walk you through exactly how to run Facebook ads in 2025, from setup to monitoring, so you can launch campaigns that convert.
What Are Facebook Ads?
Facebook ads are paid promotions that businesses create to reach specific audiences across Facebook, Instagram, Messenger, and the Audience Network— Meta’s group of partner apps and websites. This means your ads aren’t limited to Meta platforms alone; they can also appear in mobile apps or news sites outside of Facebook that are part of Meta’s advertising network.
Unlike regular posts, which only reach your followers (and maybe a few friends through shares), ads are designed to target people based on their demographics, interests, and behavior, giving you a much wider and more precise reach.
Boosted Posts vs. Facebook Ad Campaigns
It’s important to understand the difference between a boosted post and a full Facebook ad campaign, because while they may look similar, they serve very different purposes:
Boosted Post
This is achieved when you take an existing post from your page and pay Meta to show it to a larger audience. It’s a quick and simple way to increase visibility, but it offers limited control over who sees the post, where it appears, and what specific outcome you’re optimizing for.
Facebook Ad Campaign (via Ads Manager)
This gives you full control over your advertising strategy. With a Facebook ad campaign, you can choose exactly what you want to achieve (like driving sales, getting leads, or boosting website traffic), define your audience in detail, set your budget and schedule, decide where your ads will appear, and even test multiple versions of the same ad to see which performs best. This flexibility makes Ads Manager the recommended option for running serious, goal-driven campaigns.
Ultimately, whether you’re running a single ad or a full campaign, everything is managed through Meta Ads Manager, the centralized hub where all ads are created, managed, and optimized. It’s also a tool you’ll need to master to get consistent results. Now that you know what Facebook ads are, it’s important to understand why they are powerful tools for growing your business.
Benefits of Advertising Your Business on Facebook
Advertising on Facebook offers clear advantages for businesses of any size, and three of the most important are:
- Precise targeting: Meta’s ad tools let you reach people based on age, location, interests, behaviors, or even custom lists. This makes it easier to connect with the right audience instead of wasting spend on those unlikely to care about your offer.
- Flexible budgets with measurable results. You can start with a small daily budget, test different ads to see which ones perform better, and then increase your budget on the ads that bring the best results. Ads Manager also makes tracking your Facebook ads budget simple by showing exactly what you’re spending and what you’re getting in return in real time.
- Multiple ad formats to match your goals. Facebook ads can appear as videos, single images, or carousels. You can also run ads that include a simple form, where people quickly share their name or email without leaving Facebook. This way, you get different tools to either grab attention, showcase products, or collect customer details depending on what matters most for your business.
How to Run Ads on Facebook Ads (Step-by-step)
Getting started with Facebook ads might feel overwhelming at first, but Meta Ads Manager makes the process a lot more structured. By following a step-by-step approach, you can go from setting up your account to launching your first ad without missing anything important. Here’s a simple breakdown of how to run ads on Facebook.
Step 1: Set Up Meta Business & Ads Manager
Before you can create digital product ads, you need the right setup.
1. Create a Meta Business Manager Account
- Go to business.facebook.com.
- Sign in with your Facebook account and set up a free Meta Business Manager account.
- This gives you professional tools to manage ads, pages, and assets in one place.
2. Create a Facebook Business Page
Ads cannot be run from personal profiles. You’ll need a business page.
- Go to your Facebook homepage, click Pages, and create one if you don’t have one already.
- Choose a business name, category (e.g., “Education” for digital courses), and complete your page details.
3. Add Payment Information
- In Business Manager, navigate to Business Settings > Payments.
- Add your credit card, PayPal, or other payment method.
Step 2: Create Your Campaign in Ads Manager
Once your foundation is ready, it’s time to build your campaign.
1. Go to Ads Manager
- Inside Business Manager, click All Tools > Ads Manager.
- This is the hub for creating, managing, and monitoring ads.
2. Click “+ Create”
- Hit the green + Create button to start a new campaign.
Step 3: Choose Your Objective
When creating a campaign in Meta Ads Manager, the first step is choosing your advertising objective which is the main thing you want your ad to achieve. Meta currently offers six objectives:
Awareness – Best for getting your brand in front of as many people as possible. Useful if you’re just starting out or launching something new.
Traffic – Drives people to a website, landing page, or app. Helpful if you want more visits to your online store or product page.
Engagement – Encourages actions like likes, comments, shares, or event responses, making it easier to build a community around your brand.
Leads – Collects contact details (like emails or phone numbers) directly through Facebook forms or your own landing page.
App Promotion – Helps you get more people to download or use your mobile app.
Sales – Optimises your ads to drive actual purchases, either on your website, in your app, or directly through Facebook and Instagram Shops. Meta does this by showing your ads to people most likely to buy based on their past activity, e.g., clicking “add to cart” or completing a purchase. You can also connect your product catalogue so your ads automatically display items in stock, making it easier for customers to shop directly.
Step 4: Name Your Campaign
Give your campaign a clear, descriptive name so you can easily identify it later. A good rule of thumb is to include the product, audience, and goal in the name. For example: “Tropical Granola – Abuja – Traffic” or “Ebook Launch – US – Sales.” This makes it easier to stay organised, especially once you start running multiple campaigns at the same time.
Step 5: Set Your Budget & Schedule
Your budget decides how much you want to spend on your ads, while your schedule controls when your ads run. In Meta Ads Manager, you’ll see two main types of budgets:
- Daily budget – This is how much you want to spend per day. For example, setting ₦2,500/day for 7 days means Meta will try to spend around ₦2,500 each day while getting you the best results possible.
- Lifetime budget – This is the total amount you want to spend over the entire campaign. For example, if you set a lifetime budget of ₦15,000 for 7 days, Meta will spread that amount across the week, sometimes spending more on one day and less on another, depending on performance.
Pro-tips for Cost Control:
- Set a bid cap – A bid cap lets you tell Meta the maximum amount you’re willing to pay for a result (like a click or a lead). This ensures you don’t waste money on overly expensive results.
- Start small, then increase – Begin with a modest daily spend and raise it only if the ad is performing well.
- Use a clear schedule – Don’t run ads endlessly. Set start and end dates so your budget doesn’t drain without you noticing.
- Take Advantage of the Cost per Result Goal Setting - This setting tells Meta the maximum you’re willing to pay for the outcome you want. For example, if your goal is sales, you could set a limit like “Don’t spend more than ₦1,000 to get one purchase.” If your goal is awareness, you might say, “Keep the cost of reaching 1,000 people under ₦500.”
This way, Meta runs your ads but won’t go beyond the budget you’ve set for each result, helping you stay in control of your spending.
The caveat here, however, is that if your target cost is set unrealistically low, Meta may struggle to deliver your ads, or you may get fewer results. So it’s best used when you already have some data on what a “reasonable” cost per result looks like for your business.
- ROAS Goal (Return on Ad Spend) – This is a more advanced option. Instead of focusing on cost per action, you’re asking Meta to prioritise sales that give you a specific return. For example, if you set a ROAS goal of 3.0, you’re telling Meta, “Only spend my budget on people who are likely to generate at least ₦3,000 in sales for every ₦1,000 I spend.”
Note: This works best if you’ve set up the Meta Pixel or Conversions API so Meta can track actual purchases.
Together, these options help you avoid overspending and make sure your money is going toward results that matter most to your business.
Step 6: Choose Your Target Audience
This is where you tell Meta exactly who should see your ads. Instead of showing your ad to everyone, you can narrow it down to people who are most likely to buy from you.
With Meta Ads Manager, you have three main options:
- Core Audiences – With core audiences, you set the filters yourself. This means you tell Meta exactly the kind of people you want your ad to reach. Instead of showing your ad to just anyone, you narrow it down based on details such as age, gender, location, language, or interests.
- Custom Audiences – Custom audiences let you reach people who already have a connection with your business. This could be past customers whose emails you upload into Meta Ads Manager, visitors who came to your website but didn’t complete a purchase, or even people who interacted with your Instagram or Facebook content. Instead of starting fresh with strangers, you’re reminding people who already know your brand to come back and take the next step, which usually makes them easier to convert.
- Lookalike Audiences – Once you have a Custom Audience, Meta can find new people who share similar traits. For example, if your best customers are young professionals in Lagos, Meta can look for more people just like them in Nigeria.
While targeting with Meta Ads Manager makes it easier to reach the right people, recent privacy changes, especially Apple’s iOS updates, have made it harder to track every action users take across apps and websites. This means targeting isn’t always perfect, but it still gives you a more direct connection to your audience. The key is to test different audience types and focus on the ones that deliver the best results for your business.
Step 7: Select Ad Placements
Placements are the different spots where your ad can show up across Meta’s platforms. This could be in the Facebook News Feed, Instagram Stories, Reels, Messenger, or even inside partner apps and websites. By default, Meta recommends Advantage+ Placements, which automatically shows your ad in multiple places and then prioritises the ones that perform best.
For beginners, this is often the easiest option because Meta does the testing for you. However, if you want more control, you can manually choose placements, for example, focusing only on Instagram Reels if your audience skews younger, or Messenger if you want a more personal approach.
Each placement has its strengths:
- Feed: Ads appear in the main scrolling section of Facebook or Instagram and are great for longer captions, links, and detailed storytelling.
- Stories: These are full-screen, vertical ads that stay up for 24 hours. They work best for quick, eye-catching visuals because they blend naturally into how people already swipe through Stories.
- Reels: These ads appear as short-form video content when people scroll from one Reel to the next on Instagram or Facebook. They look and feel like regular Reels, except they’re sponsored, so they blend naturally into the viewing experience. This makes them a good way to reach people while they’re actively browsing short videos and open to discovering something new.
- Messenger: Ads placed in the Messenger app, where conversations happen. Best suited for businesses that want a more personal approach or direct engagement.
The real advantage of placements is flexibility: you can either let Meta spread your ad widely and optimise for results, or zero in on the exact spots where your audience is most active.
Step 8: Design Your Facebook Ad Creative
An ad creative, simply put, is the actual content of your ad. That is, the picture, video, headline, and caption people will see when your ad shows up on their Facebook or Instagram feed. A strong creative can be the difference between someone scrolling past or stopping to pay attention.
To make yours effective, let’s break it down into the key parts so you know exactly what to focus on.
Select Ad Format
- Single Image – Great for a single product.
- Video – Best for demos or storytelling.
- Carousel – Multiple images, perfect for bundles or multiple products.
Visuals
- Use high-quality images or videos.
- Showcase the product clearly (e.g., mockups of your eBook, a demo of your software).
Copywriting Tips
- Primary Text: Keep it short, benefit-driven, and engaging.
- Headline: Bold and attention-grabbing.
- Description: Extra context if needed.
Call-to-Action (CTA)
- Examples: “Shop Now,” “Download,” “Get Started,” “Learn More.”
- Always link directly to your product page or sales funnel.
Best Practices for High-Performing Facebook Ad Creatives
- Use bold visuals: Bright colours, high contrast, and eye-catching images or videos grab attention quickly.
- Keep it short: Captions should be concise and to the point. Aim for one clear message.
- Add a clear CTA (Call-to-Action): Examples include “Shop Now,” “Sign Up,” “Learn More.” Don’t assume people will know what to do.
- Follow the 20% text rule: Facebook performs best when text on your image is minimal — less than 20% of the total space.
- Match creative to your goal: If you’re selling, show the product in use. If you’re building awareness, focus on brand storytelling.
Step 9: Review and Publish
Before you hit “Publish,” it’s important to double-check your ad. Meta has strict ad policies, and if your ad doesn’t follow the rules, it can be rejected or even get your account flagged.
Things to check before publishing:
- Ad content: Avoid misleading claims, exaggerated promises, or offensive language.
- Images and videos: Don’t use shocking visuals or content that suggests unrealistic results.
- Targeting: Make sure your audience choices don’t discriminate based on personal traits like race, religion, or health conditions.
- Links: Test that your link works and takes people exactly where you promise in the ad.
Common reasons ads get rejected:
- Promoting restricted or illegal items
- Adult content
- Poor landing pages
Once everything looks good, click Publish. Meta will then review your ad, which usually takes a few minutes to 24 hours. If approved, your ad will go live and start delivering to your chosen audience.
Step 10: Monitor & Optimise Performance
In Ads Manager, track key metrics to understand how your campaigns are performing:
- Click Through Rate (CTR): This measures the percentage of people who saw your ad and actually clicked on it. A higher CTR usually means your ad copy, creative, or targeting is resonating with your audience.
- Cost Per Click (CPC): This tells you how much you are paying on average for each click on your ad. Lower CPC means you are driving traffic more cost-effectively.
- Conversions and Sales: This tracks how many people took a desired action after clicking your ad, such as signing up, purchasing, or downloading. It shows the real business impact of your campaigns.
- Return on Ad Spend (ROAS): Compares how much money you made from your ads versus how much you spent. If you spent ₦10,000 and earned ₦40,000 in sales, your ROAS is 4x.
Optimize Ads
- Test different versions of your ad (A/B testing): Try running two or more versions of the same ad with slight differences. For example, a different image, headline, or CTA. This helps you figure out what your audience responds to best.
- Adjust your audience if results are weak.
- Increase budget on winning ads, pause underperforming ones.
Running Facebook ads in 2025 is only part of the journey. Turning clicks into sales or meaningful engagement requires the right destination for your audience. With Mainstack, you can create tailored landing pages or online storefronts that act as the perfect extension of your ad campaigns. Every click from your Facebook ad can lead to pages specifically designed to showcase your products, collect leads, or drive purchases directly.
By pairing the precise targeting of Facebook Ads with Mainstack’s easy-to-use tools, you create a system where ads, pages, and customer actions work together, making it easier to track results, optimise campaigns, and grow your business efficiently.
Start building pages that connect directly to your ads today and see how a well-designed destination can turn impressions into measurable growth.
Facebook Ads Campaign Checklist
At this point, you’ve learned how to set up, target, and create effective Facebook ads and how to ensure every click leads to a page that converts impressions to sales. But, to make it even easier, we’ve put together a step-by-step checklist you can follow every time you run a campaign.
Step 1: Set Up Meta Business & Ads Manager
Step 2: Create Your Campaign in Ads Manager
Step 3: Choose Your Objective
Step 4: Name Your Campaign
Step 5: Set Your Budget & Schedule
Step 6: Choose Your Target Audience
Step 7: Select Ad Placements
Step 8: Design Your Facebook Ad Creative
Step 9: Review and Publish
Step 10: Monitor & Optimise Performance