.jpg)

Upgrading to an iPhone 17 is more than just buying the latest gadget;, it can be viewed as an investment in your creator career. With every new iteration, Apple packs in camera upgrades, faster chips, and software tools that help content look more polished and get noticed. But that new-phone price tag is real, and creators need to be sure they can earn more than they spend.
If your current device like an iPhone 15 or 16 still delivers on quality, there may be no rush to upgrade. Still, if you leverage iPhone 17’s new features smartly, you can monetize its power and recoup the cost through creation, sales, or partnerships.
Let’s explore how.
iPhone 17 Features That Help Creators Earn
- Camera & Video Enhancements
The iPhone 17 introduces a larger main sensor, improved optical image stabilization, better low-light performance, and sharper zoom. These upgrades mean creators can shoot cleaner, more professional video especially in dim settings like events or home studios. Cinematic mode and ProRes video give creators tools to distinguish their content from standard mobile footage.
- Performance & Speed
With the newer A-series chip, more RAM, and faster write speeds, editing video and photos directly on the phone becomes smoother. Faster rendering, better multitasking, and quicker previews reduce time wasted. The improved storage options (higher capacity) also let creators keep more raw footage and assets without external backups.
- Display & Battery
A brighter, more color-accurate display helps when editing in sunlight or when checking color grading. Higher refresh rates make the experience feel smooth, especially in editing apps or scrolling through timelines. Improved battery life means longer shooting sessions, fewer mid-shoot shutdowns, and less downtime charging.
- Connectivity & Accessories
Faster 5G, enhanced WiFi bands, and better Bluetooth connectivity improve uploading speed and live streaming quality. Supporting accessories such as external mics, gimbals or lenses matter more when the base hardware can support high bit-rate video or external-device input without lag.
- Software Tools & Ecosystem
Apple continues building tools and software features like photo and video editing apps, filters, live streaming tools, and seamless iCloud sync. Features like seamless backup, sharing, and cloud workflows mean less time lost managing files and more time creating.
Ways Creators Can Monetize Using the iPhone 17
Video Content
Post high-quality Reels, Shorts, TikToks, YouTube content. With iPhone 17’s improved camera, your content can look more professional, helping attract larger audiences and monetize via ad revenue or brand partnerships.

Photography & Stock
Thanks to the upgraded sensor and image clarity, you can shoot stock photos for marketplaces like Shutterstock or Adobe Stock. Also shoot paid commissioned photography; social media photos, portraits, or product shots.
Live Streaming & Virtual Events
Use the front and rear cameras to host live workshops, Q&A sessions, or streaming classes. The iPhone 17’s faster connectivity helps reduce lag and maintain quality during livestreams.
Vlogging / Podcasting with Video
If you vlog or do podcasts with video, the iPhone 17 lets you capture high-quality video with good audio (especially if paired with external mic). You can also record video “bites” for content repurposing, e.g., social clips, teasers.
Selling Digital Products
Use your iPhone 17 to create presets, LUTs, photo filters, templates, or motion graphics. Sell them on marketplaces or your own site. Since you already own the hardware, profit margins are high.
Sponsored Content & Brand Deals
Higher-quality visuals make your content more attractive to brands. When you can show photos or videos that look sharp, clean, and professional, you are in a stronger position to pitch for sponsorships or paid collaborations.
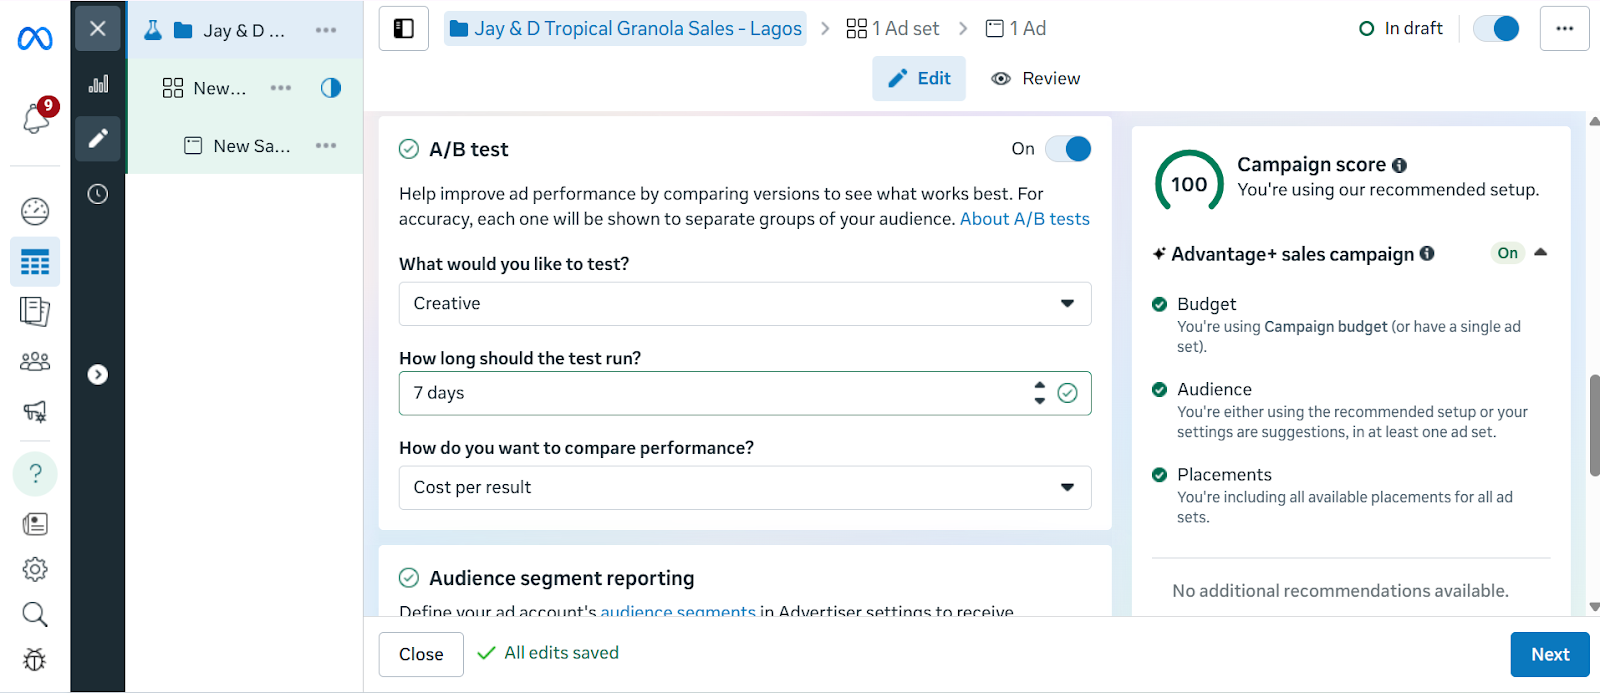
Recovering the Cost: Strategy & When Upgrading Makes Sense
Cost vs Expected Revenue
Calculate device cost + accessories + any subscriptions vs projected earnings. For example, if you can make $20-$50/month more with better video or photo quality, you may recover costs in 6-12 months.
Leveraging Micro-services
Offer small gigs: social media clips, editing or retouching, stock photos. These help recoup cost bit by bit.
Are Old iPhone 15 / 16 Models Enough?
If you already own iPhone 15 or 16 and your video, camera, and editing needs are met, waiting might make sense. Upgrading only becomes essential when image quality, speed, or battery life begins to limit your growth or deliverables.
Break-Even Analysis
A break-even analysis helps you figure out how long it will take to earn back the cost of your iPhone 17 through the extra income it brings you.
Here’s how to do it in plain steps:
- Find the Total Cost
Write down how much the iPhone 17 costs, including accessories or insurance if you’re buying them too. - Estimate Your Extra Monthly Income
Think about how much more money you expect to make each month using the new phone. For example, from creating better content, landing new clients, or running your business faster. - Divide Cost by Extra Income
Take the total cost of the phone and divide it by your estimated extra monthly income.
- Example: Phone costs $1,200. Extra income per month = $300.
- $1,200 ÷ $300 = 4 months to break even.
If the extra income is less than the phone’s cost, it might be better to wait or save up before upgrading.
Practical Tips to Maximize Earnings Using iPhone 17
- Use the native camera app or high-quality third-party apps that unlock full sensor potential.
- Shoot during golden hour or good lighting to reduce editing needs.
- Learn to use features like ProRes, Cinematic, or Photonic Engine (if available) for signature look.
- Use presets or LUTs to speed up editing.
- Keep your files organized by using clear folders, tags, and file names. Add helpful details (metadata) to make them easy to find later, and back everything up to cloud storage so you never lose important work.
- Invest in small accessories like tripod, mic, lenses, etc that boost production value.
Risks & Drawbacks Before Upgrading
- Depreciation: New Apple phones lose resale value.
- Storage limitations: If you get a model with low storage, video and raw files may fill up fast.
- Battery lifespan: Heavy use drains battery and battery health declines with time.
- Time investment: Learning new features, workflows, and editing tools takes effort.
Investing in the iPhone 17 can be a smart move if you’re a creator serious about stepping up your content quality, speed, and professionalism. The camera upgrades, better performance, improved battery, and software tools are not just luxury, they are instruments that can help you earn back what you spend through video, photo, sponsorships, and product sales.
That being said, if your iPhone 15 or 16 still meets your needs and does not limit your creativity, there is no urgent need to upgrade. Your time, skills, and consistency often matter more than the hardware alone. Before buying, plan out how you will monetize its features. Monetizing your iPhone 17 turns it from an expense into an investment, one that pays off when used with purpose.
Upgrading to an iPhone 17 is more than just buying the latest gadget;, it can be viewed as an investment in your creator career. With every new iteration, Apple packs in camera upgrades, faster chips, and software tools that help content look more polished and get noticed. But that new-phone price tag is real, and creators need to be sure they can earn more than they spend.
If your current device like an iPhone 15 or 16 still delivers on quality, there may be no rush to upgrade. Still, if you leverage iPhone 17’s new features smartly, you can monetize its power and recoup the cost through creation, sales, or partnerships.
Let’s explore how.
iPhone 17 Features That Help Creators Earn
- Camera & Video Enhancements
The iPhone 17 introduces a larger main sensor, improved optical image stabilization, better low-light performance, and sharper zoom. These upgrades mean creators can shoot cleaner, more professional video especially in dim settings like events or home studios. Cinematic mode and ProRes video give creators tools to distinguish their content from standard mobile footage.
- Performance & Speed
With the newer A-series chip, more RAM, and faster write speeds, editing video and photos directly on the phone becomes smoother. Faster rendering, better multitasking, and quicker previews reduce time wasted. The improved storage options (higher capacity) also let creators keep more raw footage and assets without external backups.
- Display & Battery
A brighter, more color-accurate display helps when editing in sunlight or when checking color grading. Higher refresh rates make the experience feel smooth, especially in editing apps or scrolling through timelines. Improved battery life means longer shooting sessions, fewer mid-shoot shutdowns, and less downtime charging.
- Connectivity & Accessories
Faster 5G, enhanced WiFi bands, and better Bluetooth connectivity improve uploading speed and live streaming quality. Supporting accessories such as external mics, gimbals or lenses matter more when the base hardware can support high bit-rate video or external-device input without lag.
- Software Tools & Ecosystem
Apple continues building tools and software features like photo and video editing apps, filters, live streaming tools, and seamless iCloud sync. Features like seamless backup, sharing, and cloud workflows mean less time lost managing files and more time creating.
Ways Creators Can Monetize Using the iPhone 17
Video Content
Post high-quality Reels, Shorts, TikToks, YouTube content. With iPhone 17’s improved camera, your content can look more professional, helping attract larger audiences and monetize via ad revenue or brand partnerships.
Photography & Stock
Thanks to the upgraded sensor and image clarity, you can shoot stock photos for marketplaces like Shutterstock or Adobe Stock. Also shoot paid commissioned photography; social media photos, portraits, or product shots.
Live Streaming & Virtual Events
Use the front and rear cameras to host live workshops, Q&A sessions, or streaming classes. The iPhone 17’s faster connectivity helps reduce lag and maintain quality during livestreams.
Vlogging / Podcasting with Video
If you vlog or do podcasts with video, the iPhone 17 lets you capture high-quality video with good audio (especially if paired with external mic). You can also record video “bites” for content repurposing, e.g., social clips, teasers.
Selling Digital Products
Use your iPhone 17 to create presets, LUTs, photo filters, templates, or motion graphics. Sell them on marketplaces or your own site. Since you already own the hardware, profit margins are high.
Sponsored Content & Brand Deals
Higher-quality visuals make your content more attractive to brands. When you can show photos or videos that look sharp, clean, and professional, you are in a stronger position to pitch for sponsorships or paid collaborations.
Recovering the Cost: Strategy & When Upgrading Makes Sense
Cost vs Expected Revenue
Calculate device cost + accessories + any subscriptions vs projected earnings. For example, if you can make $20-$50/month more with better video or photo quality, you may recover costs in 6-12 months.
Leveraging Micro-services
Offer small gigs: social media clips, editing or retouching, stock photos. These help recoup cost bit by bit.
Are Old iPhone 15 / 16 Models Enough?
If you already own iPhone 15 or 16 and your video, camera, and editing needs are met, waiting might make sense. Upgrading only becomes essential when image quality, speed, or battery life begins to limit your growth or deliverables.
Break-Even Analysis
A break-even analysis helps you figure out how long it will take to earn back the cost of your iPhone 17 through the extra income it brings you.
Here’s how to do it in plain steps:
- Find the Total Cost
Write down how much the iPhone 17 costs, including accessories or insurance if you’re buying them too. - Estimate Your Extra Monthly Income
Think about how much more money you expect to make each month using the new phone. For example, from creating better content, landing new clients, or running your business faster. - Divide Cost by Extra Income
Take the total cost of the phone and divide it by your estimated extra monthly income.
- Example: Phone costs $1,200. Extra income per month = $300.
- $1,200 ÷ $300 = 4 months to break even.
If the extra income is less than the phone’s cost, it might be better to wait or save up before upgrading.
Practical Tips to Maximize Earnings Using iPhone 17
- Use the native camera app or high-quality third-party apps that unlock full sensor potential.
- Shoot during golden hour or good lighting to reduce editing needs.
- Learn to use features like ProRes, Cinematic, or Photonic Engine (if available) for signature look.
- Use presets or LUTs to speed up editing.
- Keep your files organized by using clear folders, tags, and file names. Add helpful details (metadata) to make them easy to find later, and back everything up to cloud storage so you never lose important work.
- Invest in small accessories like tripod, mic, lenses, etc that boost production value.
Risks & Drawbacks Before Upgrading
- Depreciation: New Apple phones lose resale value.
- Storage limitations: If you get a model with low storage, video and raw files may fill up fast.
- Battery lifespan: Heavy use drains battery and battery health declines with time.
- Time investment: Learning new features, workflows, and editing tools takes effort.
Investing in the iPhone 17 can be a smart move if you’re a creator serious about stepping up your content quality, speed, and professionalism. The camera upgrades, better performance, improved battery, and software tools are not just luxury, they are instruments that can help you earn back what you spend through video, photo, sponsorships, and product sales.
That being said, if your iPhone 15 or 16 still meets your needs and does not limit your creativity, there is no urgent need to upgrade. Your time, skills, and consistency often matter more than the hardware alone. Before buying, plan out how you will monetize its features. Monetizing your iPhone 17 turns it from an expense into an investment, one that pays off when used with purpose.


.png)