
Your digital storefront is more than just a webpage, it's your gateway to turning skills, knowledge, and services into sustainable income streams. Whether you're selling digital products, offering coaching services, or monetizing your expertise, creating a high-converting product page is essential for maximizing your online earning potential.
In today's competitive digital landscape, creators and entrepreneurs need every advantage to stand out and convert visitors into paying customers. Your product or service page serves as your 24/7 salesperson, working to showcase your offerings and persuade potential customers to take action, even while you sleep.
The Foundation: Understanding Your Digital Storefront
Your product page is essentially your digital storefront, the place where potential customers decide whether to invest in what you're offering. According to recent research by Baymard Institute, the average website conversion rate across industries is just 2.17%, meaning there's significant room for improvement for most businesses.
The key to building a high-converting page lies in understanding that visitors arrive with specific problems they need solved. Your job is to clearly demonstrate how your product or service provides that solution while removing any barriers to purchase.
1. Lead with Benefits, Not Just Features
Instead of simply listing what your product includes, focus on the transformation it provides. If you're selling an online course, don't just mention "10 video lessons and downloadable templates." Instead, highlight outcomes like "Master the skills to earn $5,000+ monthly from freelancing in 90 days."
This approach aligns with how successful creators think about monetization—focusing on the value delivered rather than just the deliverables. Use customer success stories and specific results to make your benefits tangible and credible.
2. Create Visual Appeal That Builds Trust
Your webpage design should reflect professionalism while remaining approachable. Use high-quality images, clean layouts, and consistent branding throughout. Video content is particularly powerful; HubSpot reports that including video on landing pages can increase conversion rates by up to 80%.

Consider showcasing your product in action, featuring customer testimonials on video, or providing a behind-the-scenes look at your process. This visual storytelling helps build the trust necessary for online transactions.
3. Optimize Your Calls-to-Action (CTAs)
Your CTAs should be impossible to miss and irresistible to click. Use action-oriented language that creates urgency while addressing common objections. Instead of generic "Buy Now" buttons, try specific phrases like:
- "Start Earning in 24 Hours"
- "Get Instant Access"
- "Join 10,000+ Successful Students"
- "Claim Your Spot Today"
Position your primary CTA above the fold and repeat it strategically throughout the page. Research by WordStream shows that pages with a single, focused CTA can increase conversions by up to 371%.
4. Address Common Objections Proactively
Anticipate and address the concerns that might prevent someone from purchasing. Common objections include:
- Time concerns: "I don't have time to implement this"
- Skill doubts: "This seems too advanced for me"
- Value questions: "Is this worth the investment?"
- Trust issues: "How do I know this actually works?"
Use testimonials, guarantees, FAQ sections, and detailed product descriptions to overcome these barriers. Social proof is particularly powerful, display customer count, testimonials, and success stories prominently.
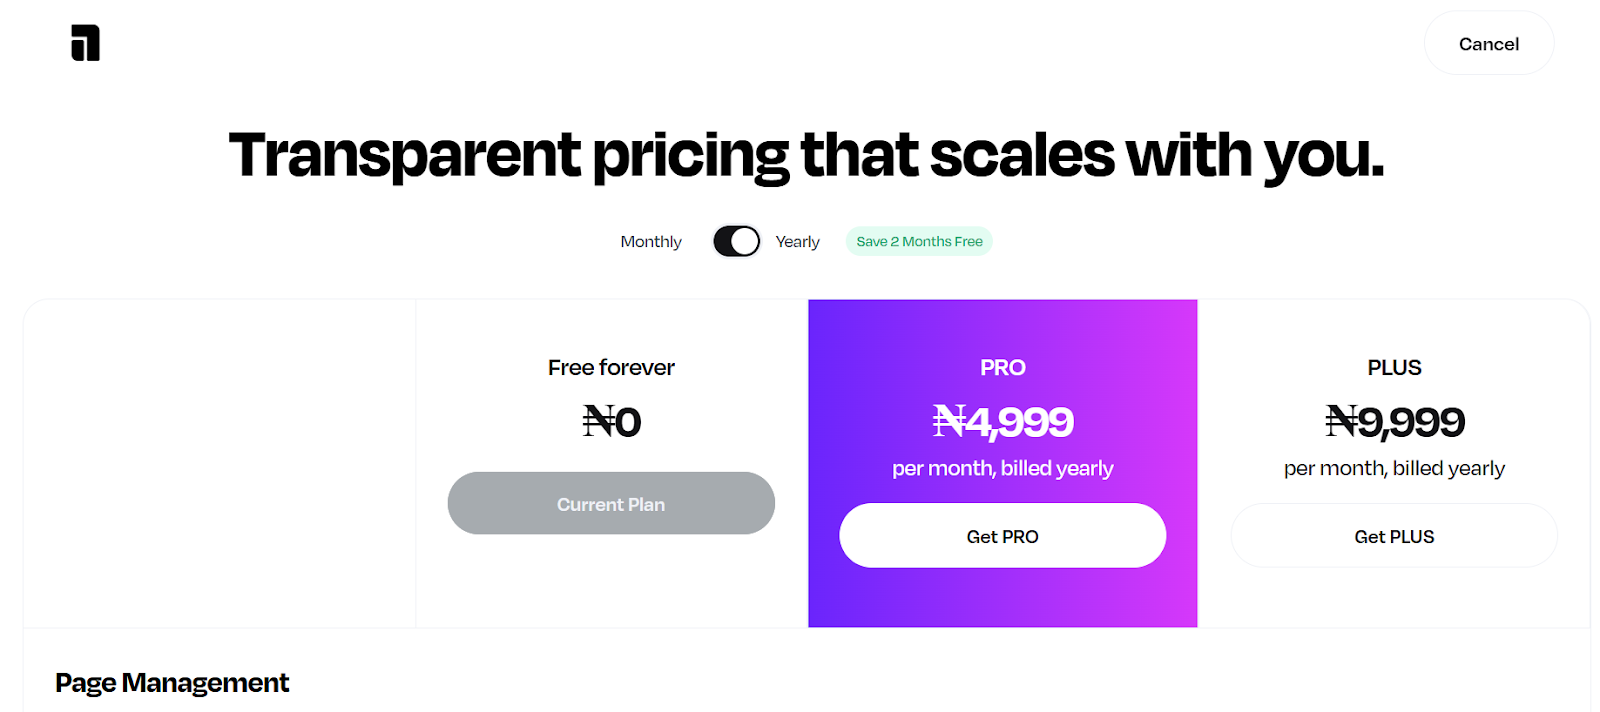
5. Implement Flexible Pricing Strategies
Modern customers expect pricing flexibility. Consider offering:
- Multiple payment options: One-time payments, payment plans, or pay-what-you-want pricing
- Tiered offerings: Good, better, best options to accommodate different budgets
- Limited-time offers: Create urgency with early-bird pricing or seasonal discounts
- Free trials or samples: Let customers experience value before committing
Research by ProfitWell indicates that offering multiple pricing options can increase conversion rates by up to 20% by accommodating different customer preferences and budgets.
6. Optimize for Global Audiences
If you're selling globally, consider currency localization and cultural preferences. Displaying prices in local currencies can significantly impact conversion rates, studies show that 92% of online shoppers prefer to see prices in their local currency.
Additionally, ensure your page loads quickly across different regions and devices. Google reports that 53% of mobile users abandon sites that take longer than 3 seconds to load.
7. Use Data to Drive Continuous Improvement
Implement analytics to track key metrics like:
- Conversion rate: Percentage of visitors who make a purchase
- Bounce rate: Visitors who leave without engaging
- Time on page: How long visitors spend reading your content
- Click-through rates: Performance of different CTAs and links
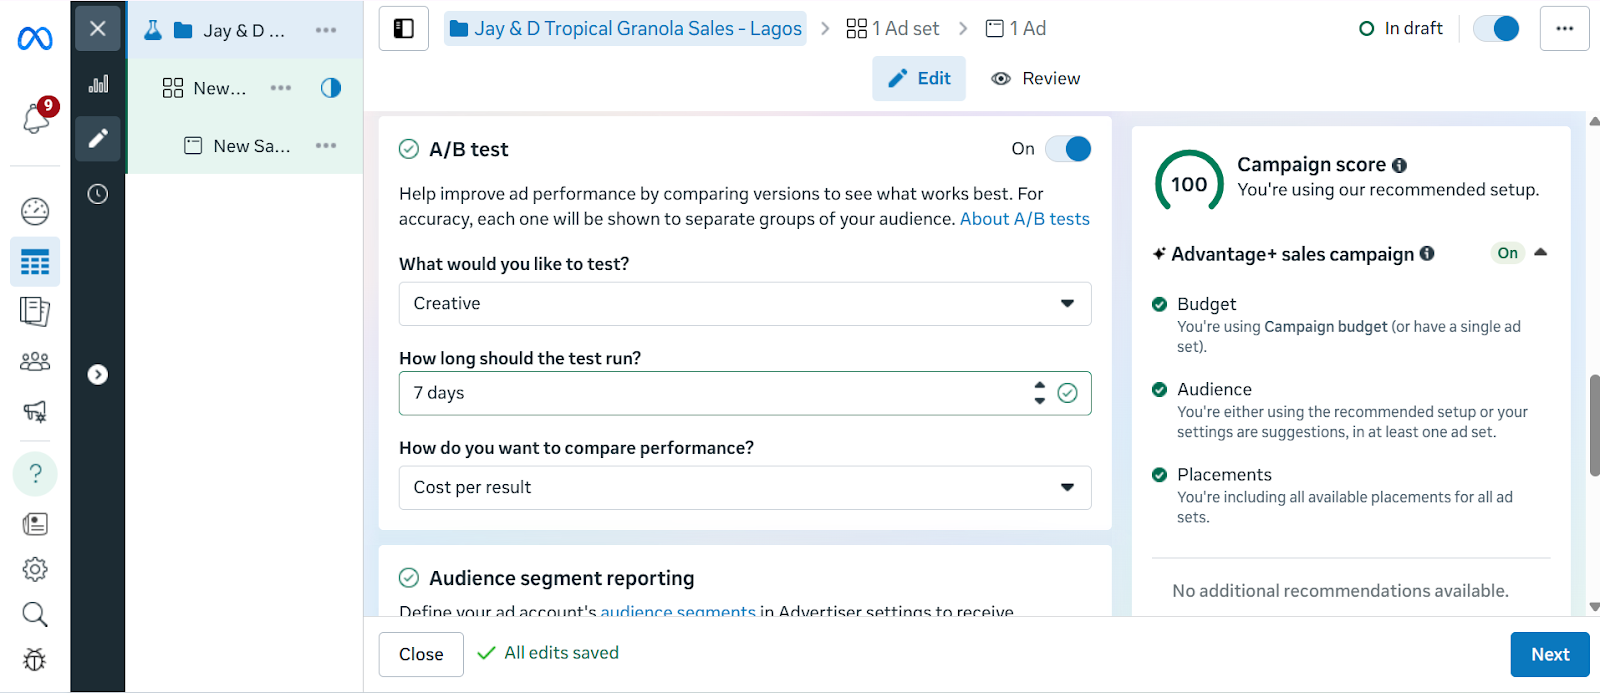
Use A/B testing to experiment with different headlines, images, pricing displays, and CTA placements. Even small improvements can compound into significant revenue increases over time.
8. Build for Mobile-First Experience
With mobile commerce accounting for over 50% of online sales, your product page must provide an excellent mobile experience. Ensure:
- Fast loading times on mobile devices
- Easy-to-tap buttons and links
- Readable text without zooming
- Streamlined checkout process
- Mobile-optimized images and videos
9. Create Urgency Without Being Pushy
Genuine scarcity and urgency can significantly boost conversions when used ethically. Consider:
- Limited enrollment periods for courses or programs
- Seasonal pricing that reflects real business cycles
- Bonus deadlines that add value for early action
- Stock limitations for physical products or limited cohorts
Avoid fake countdown timers or manufactured scarcity, as these tactics can damage trust and brand reputation.
10. Streamline the Purchase Process
Remove friction from your checkout process by:
- Minimizing required form fields
- Offering guest checkout options
- Displaying security badges and guarantees
- Providing multiple payment methods
- Being transparent about all costs upfront
Research by Baymard Institute shows that 70% of online shopping carts are abandoned, often due to complicated checkout processes or unexpected costs.
Turn Your Knowledge Into Income Today
Creating a high-converting product or service webpage is both an art and a science. It requires understanding your audience, clearly communicating value, and continuously optimizing based on real performance data.
The most successful online entrepreneurs understand that their webpage is never "finished", it's a living asset that evolves with their business and customer feedback. By implementing these strategies and maintaining a focus on customer value, you can create a digital storefront that not only showcases your offerings but consistently converts visitors into satisfied customers.
Remember, every element of your page should serve the goal of helping potential customers understand how your product or service will improve their lives or solve their problems. When you focus on delivering genuine value and removing barriers to purchase, conversions naturally follow.
Build your high-converting storefront today. Whether you're selling digital products, offering services, or monetizing your expertise, the right tools and strategies can help you turn your knowledge into sustainable income streams. Start building your professional webpage today and join thousands of creators who are successfully monetizing their skills online.
Your digital storefront is more than just a webpage, it's your gateway to turning skills, knowledge, and services into sustainable income streams. Whether you're selling digital products, offering coaching services, or monetizing your expertise, creating a high-converting product page is essential for maximizing your online earning potential.
In today's competitive digital landscape, creators and entrepreneurs need every advantage to stand out and convert visitors into paying customers. Your product or service page serves as your 24/7 salesperson, working to showcase your offerings and persuade potential customers to take action, even while you sleep.
The Foundation: Understanding Your Digital Storefront
Your product page is essentially your digital storefront, the place where potential customers decide whether to invest in what you're offering. According to recent research by Baymard Institute, the average website conversion rate across industries is just 2.17%, meaning there's significant room for improvement for most businesses.
The key to building a high-converting page lies in understanding that visitors arrive with specific problems they need solved. Your job is to clearly demonstrate how your product or service provides that solution while removing any barriers to purchase.
1. Lead with Benefits, Not Just Features
Instead of simply listing what your product includes, focus on the transformation it provides. If you're selling an online course, don't just mention "10 video lessons and downloadable templates." Instead, highlight outcomes like "Master the skills to earn $5,000+ monthly from freelancing in 90 days."
This approach aligns with how successful creators think about monetization—focusing on the value delivered rather than just the deliverables. Use customer success stories and specific results to make your benefits tangible and credible.
2. Create Visual Appeal That Builds Trust
Your webpage design should reflect professionalism while remaining approachable. Use high-quality images, clean layouts, and consistent branding throughout. Video content is particularly powerful; HubSpot reports that including video on landing pages can increase conversion rates by up to 80%.
Consider showcasing your product in action, featuring customer testimonials on video, or providing a behind-the-scenes look at your process. This visual storytelling helps build the trust necessary for online transactions.
3. Optimize Your Calls-to-Action (CTAs)
Your CTAs should be impossible to miss and irresistible to click. Use action-oriented language that creates urgency while addressing common objections. Instead of generic "Buy Now" buttons, try specific phrases like:
- "Start Earning in 24 Hours"
- "Get Instant Access"
- "Join 10,000+ Successful Students"
- "Claim Your Spot Today"
Position your primary CTA above the fold and repeat it strategically throughout the page. Research by WordStream shows that pages with a single, focused CTA can increase conversions by up to 371%.
4. Address Common Objections Proactively
Anticipate and address the concerns that might prevent someone from purchasing. Common objections include:
- Time concerns: "I don't have time to implement this"
- Skill doubts: "This seems too advanced for me"
- Value questions: "Is this worth the investment?"
- Trust issues: "How do I know this actually works?"
Use testimonials, guarantees, FAQ sections, and detailed product descriptions to overcome these barriers. Social proof is particularly powerful, display customer count, testimonials, and success stories prominently.
5. Implement Flexible Pricing Strategies
Modern customers expect pricing flexibility. Consider offering:
- Multiple payment options: One-time payments, payment plans, or pay-what-you-want pricing
- Tiered offerings: Good, better, best options to accommodate different budgets
- Limited-time offers: Create urgency with early-bird pricing or seasonal discounts
- Free trials or samples: Let customers experience value before committing
Research by ProfitWell indicates that offering multiple pricing options can increase conversion rates by up to 20% by accommodating different customer preferences and budgets.
6. Optimize for Global Audiences
If you're selling globally, consider currency localization and cultural preferences. Displaying prices in local currencies can significantly impact conversion rates, studies show that 92% of online shoppers prefer to see prices in their local currency.
Additionally, ensure your page loads quickly across different regions and devices. Google reports that 53% of mobile users abandon sites that take longer than 3 seconds to load.
7. Use Data to Drive Continuous Improvement
Implement analytics to track key metrics like:
- Conversion rate: Percentage of visitors who make a purchase
- Bounce rate: Visitors who leave without engaging
- Time on page: How long visitors spend reading your content
- Click-through rates: Performance of different CTAs and links
Use A/B testing to experiment with different headlines, images, pricing displays, and CTA placements. Even small improvements can compound into significant revenue increases over time.
8. Build for Mobile-First Experience
With mobile commerce accounting for over 50% of online sales, your product page must provide an excellent mobile experience. Ensure:
- Fast loading times on mobile devices
- Easy-to-tap buttons and links
- Readable text without zooming
- Streamlined checkout process
- Mobile-optimized images and videos
9. Create Urgency Without Being Pushy
Genuine scarcity and urgency can significantly boost conversions when used ethically. Consider:
- Limited enrollment periods for courses or programs
- Seasonal pricing that reflects real business cycles
- Bonus deadlines that add value for early action
- Stock limitations for physical products or limited cohorts
Avoid fake countdown timers or manufactured scarcity, as these tactics can damage trust and brand reputation.
10. Streamline the Purchase Process
Remove friction from your checkout process by:
- Minimizing required form fields
- Offering guest checkout options
- Displaying security badges and guarantees
- Providing multiple payment methods
- Being transparent about all costs upfront
Research by Baymard Institute shows that 70% of online shopping carts are abandoned, often due to complicated checkout processes or unexpected costs.
Turn Your Knowledge Into Income Today
Creating a high-converting product or service webpage is both an art and a science. It requires understanding your audience, clearly communicating value, and continuously optimizing based on real performance data.
The most successful online entrepreneurs understand that their webpage is never "finished", it's a living asset that evolves with their business and customer feedback. By implementing these strategies and maintaining a focus on customer value, you can create a digital storefront that not only showcases your offerings but consistently converts visitors into satisfied customers.
Remember, every element of your page should serve the goal of helping potential customers understand how your product or service will improve their lives or solve their problems. When you focus on delivering genuine value and removing barriers to purchase, conversions naturally follow.
Build your high-converting storefront today. Whether you're selling digital products, offering services, or monetizing your expertise, the right tools and strategies can help you turn your knowledge into sustainable income streams. Start building your professional webpage today and join thousands of creators who are successfully monetizing their skills online.


.png)