How-Tos

Automation For Digital Creators

Discover how automation for digital creators with tools like Zapier and AI workflows help streamline tasks, enabling you to focus on scaling your business.
Product Updates
New Feature Launch: Meta Pixel Integration Is Now Live on Mainstack
Add Meta Pixel to your Mainstack page to track conversions, retarget visitors, and optimize Facebook and Instagram ads. set up Meta Pixel on Mainstack.
Mainstack Editorial Team
November 21, 2025
10 min read
Read more
Button ArrowButton Arrow

We’re thrilled to announce a brand-new feature: Meta Pixel Integration is now available on Mainstack!

With this update, you can easily add Meta Pixel (formerly Facebook Pixel) to your Mainstack page to track conversions, measure ad performance, and optimize your marketing campaigns across Facebook and Instagram.

If you use Mainstack to promote your products, digital services, or affiliate offers, this new feature helps you understand your audience better and turn every click into a conversion.

What Is Meta Pixel Integration and Why It Matters

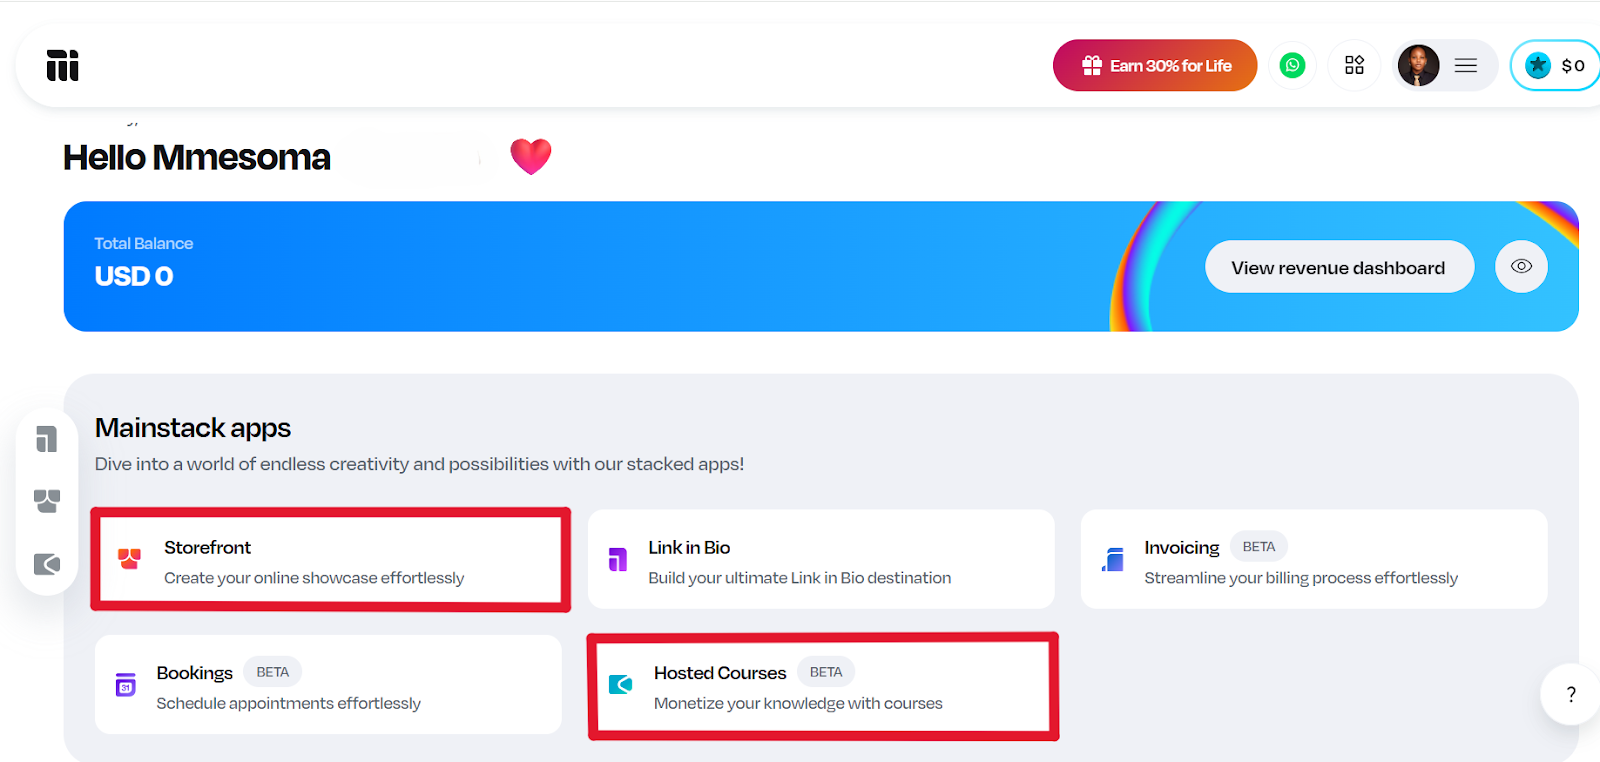
The Meta Pixel is a powerful analytics tool from Meta (formerly Facebook) that helps you understand what happens after people visit your page. When you connect it to your Mainstack Storefront or Hosted Course, you unlock a new level of insight into how your visitors engage, click, and convert.

Here’s what it helps you do:

  • Track conversions that matter: See exactly how many people click your links, sign up for your course, or complete a purchase on your Mainstack page.
  • Measure your ad results: Know which Facebook or Instagram ads are actually driving traffic and sales, not just impressions.
  • Retarget your visitors: Reconnect with people who viewed your page but didn’t buy or sign up and bring them back with the right ad.
  • Optimize ad delivery automatically: Meta’s algorithm uses your pixel data to find more people like your best customers, so your ads convert better over time.

With Meta Pixel integration on Mainstack, you can finally see the full picture without using multiple tools or complicated setups. It’s everything you need to run smarter ads, understand your audience, and grow faster, all in one place.

How to Set Up Meta Pixel Integration on Mainstack (Step-by-Step Guide)

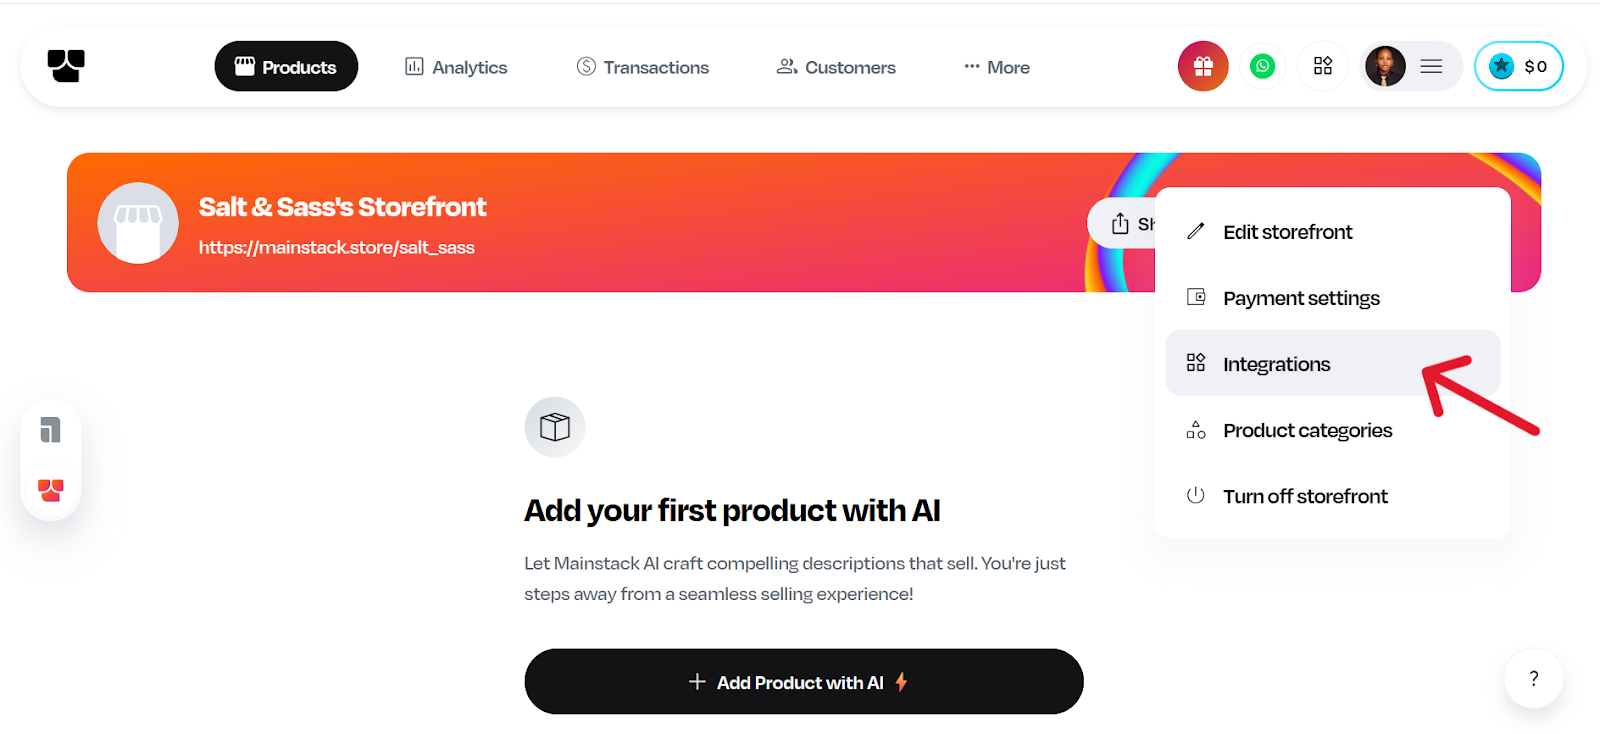
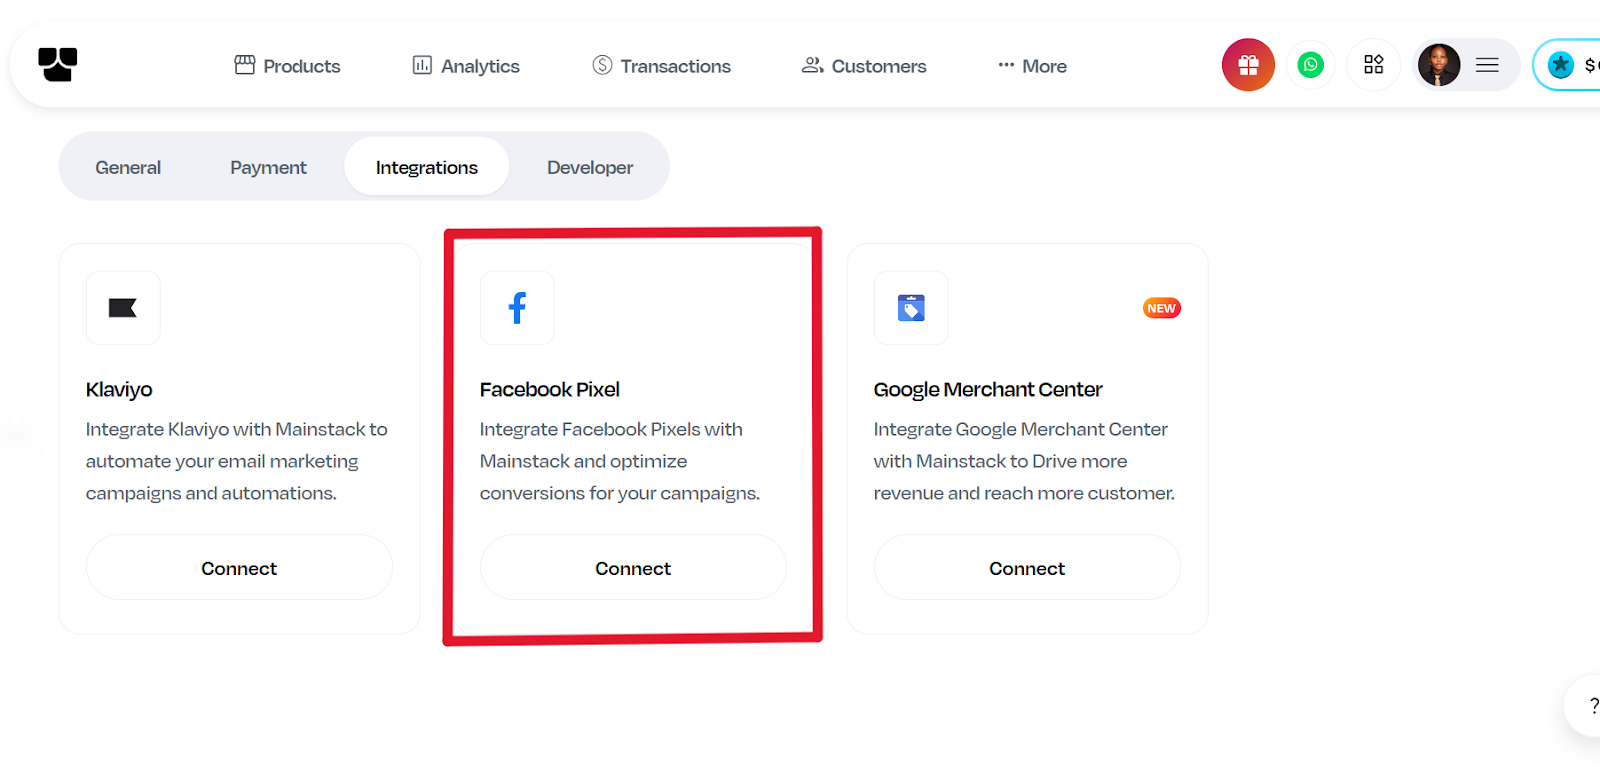
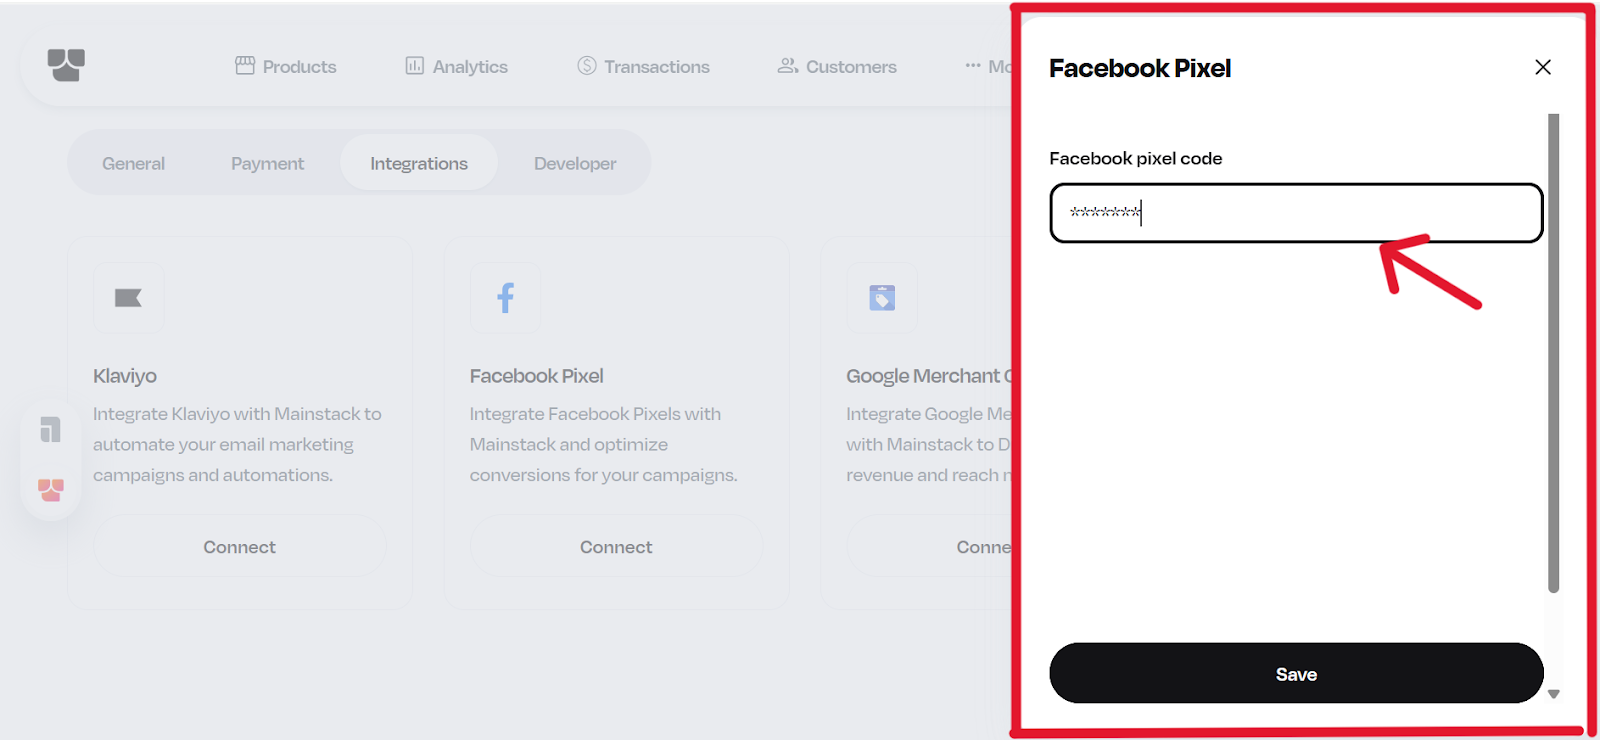
Setting up Meta Pixel on Mainstack takes just a few minutes. Here’s how to do it:

Step 1: Find your Meta Pixel ID

  1. Go to Meta Business Suite or Meta Business Manager: business.facebook.com
  2. Open Events Manager (left sidebar → Data SourcesPixels).
Screenshot of the Facebook Business interface with an arrow pointing to the Events Manager option in the left-hand menu.

  1. Select the Pixel you want to use. The Pixel ID is displayed near the Pixel name (the long number).

Screenshot of the Facebook Business Data Sources page with an arrow pointing to the Meta Pixel ID.

  1. Copy that Pixel ID and paste it into Mainstack.
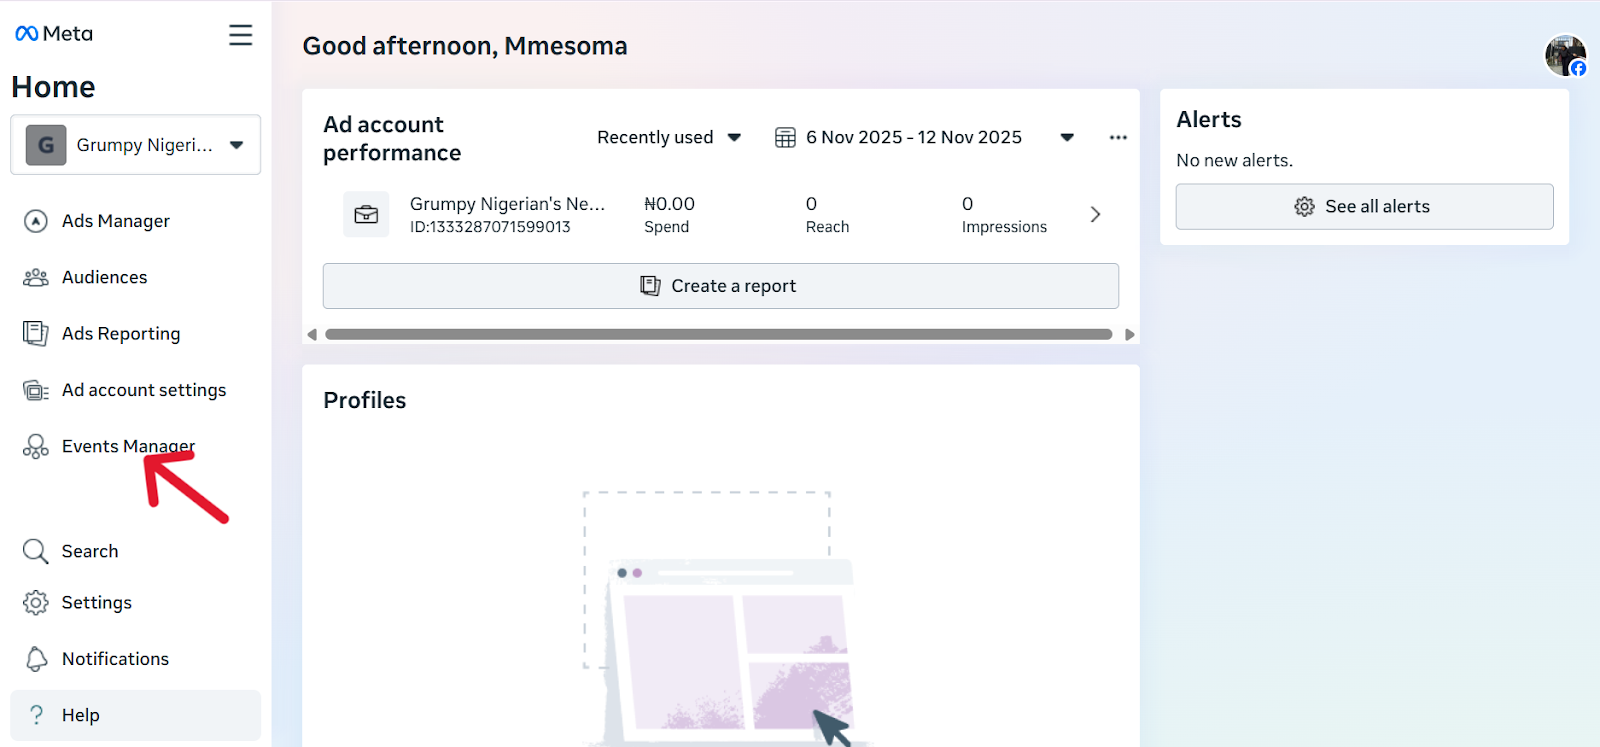
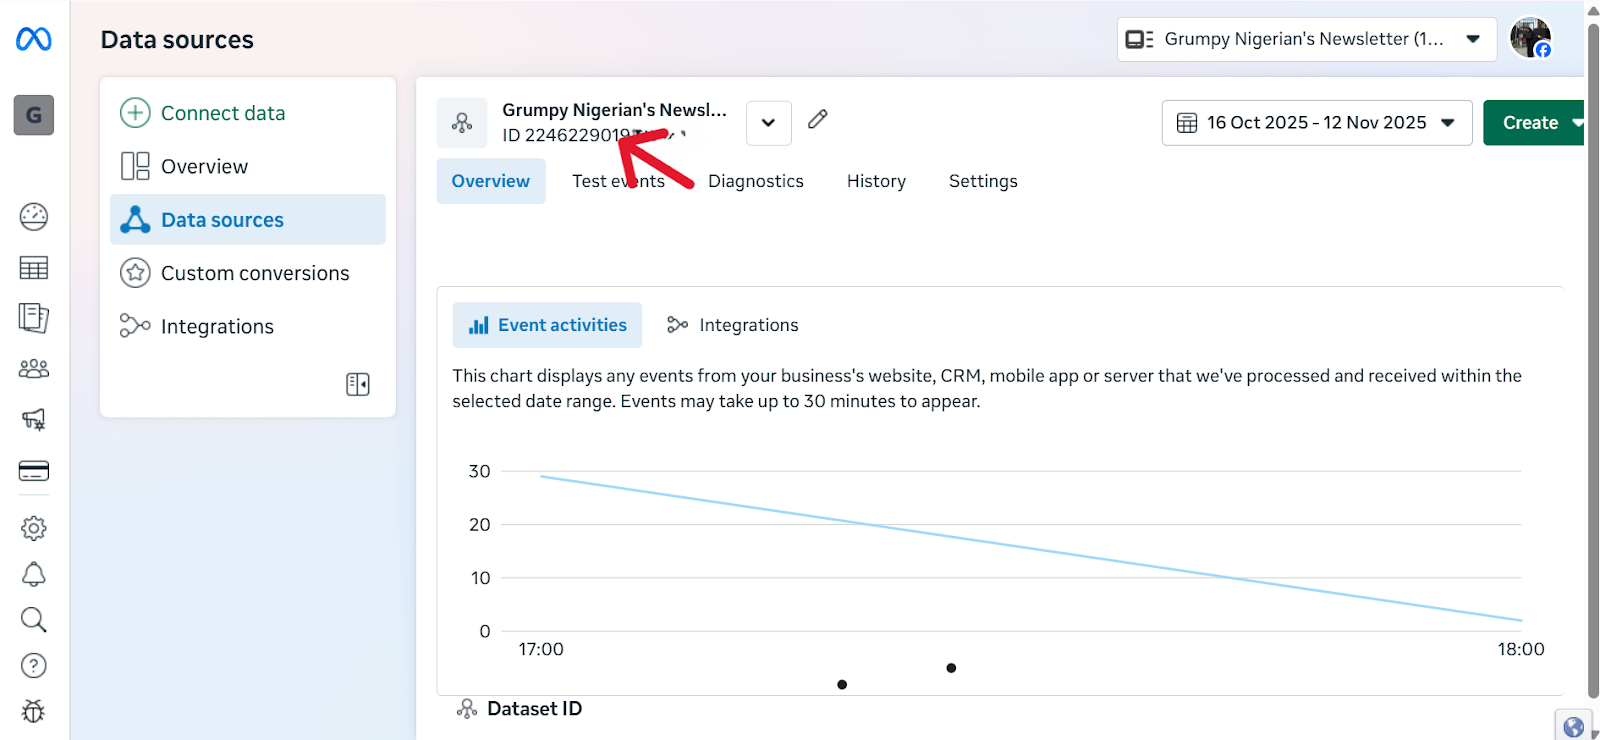
💡 Pro tip: If you don’t have a pixel yet, create one in Events Manager → Add Data SourceWebMeta Pixel and follow the prompts. Then return here to copy the Pixel ID.

Step 2: Connect Meta Pixel inside Mainstack 

  1. Login to your Mainstack dashboard.
Snapshot of the Mainstack dashboard.

  1. Open the Storefront or Hosted Courses page you want to track. 

Screenshot of the Mainstack dashboard with the Storefront and Hosted Courses apps highlighted.

💡 Note: If you have multiple pages, repeat this setup for each page or connect at the account-level.

  1. Next, click the three-dot menu (⋮) in the top-right corner of that page’s editor.
Screenshot of a Mainstack user’s storefront dashboard with an arrow pointing to the three-dot menu icon, showing where to click for additional options.

  1. Select Integrations from the dropdown.

Mainstack Storefront interface with the drop-down menu expanded, and an arrow highlighting the ‘Integrations’ menu item.

  1. Look for Facebook Pixel in the list and click Connect.

Mainstack Storefront Integrations page displaying three integration options—Klaviyo for email marketing, Facebook Pixel for tracking, and Google Merchant Center for product listings.

  1. Paste your Meta Pixel ID into the Pixel ID field.

Mainstack Facebook Pixel setup highlighted on the right-hand panel with an arrow pointing to the text field where users can enter their Meta Pixel ID.

  1. Click Save, and your tracking goes live instantly.

Once connected, Mainstack automatically starts sending tracking events to your Meta Pixel, so you can monitor link clicks, conversions, and user interactions from your ad campaigns.

Step 3: Verify the Pixel is installed correctly

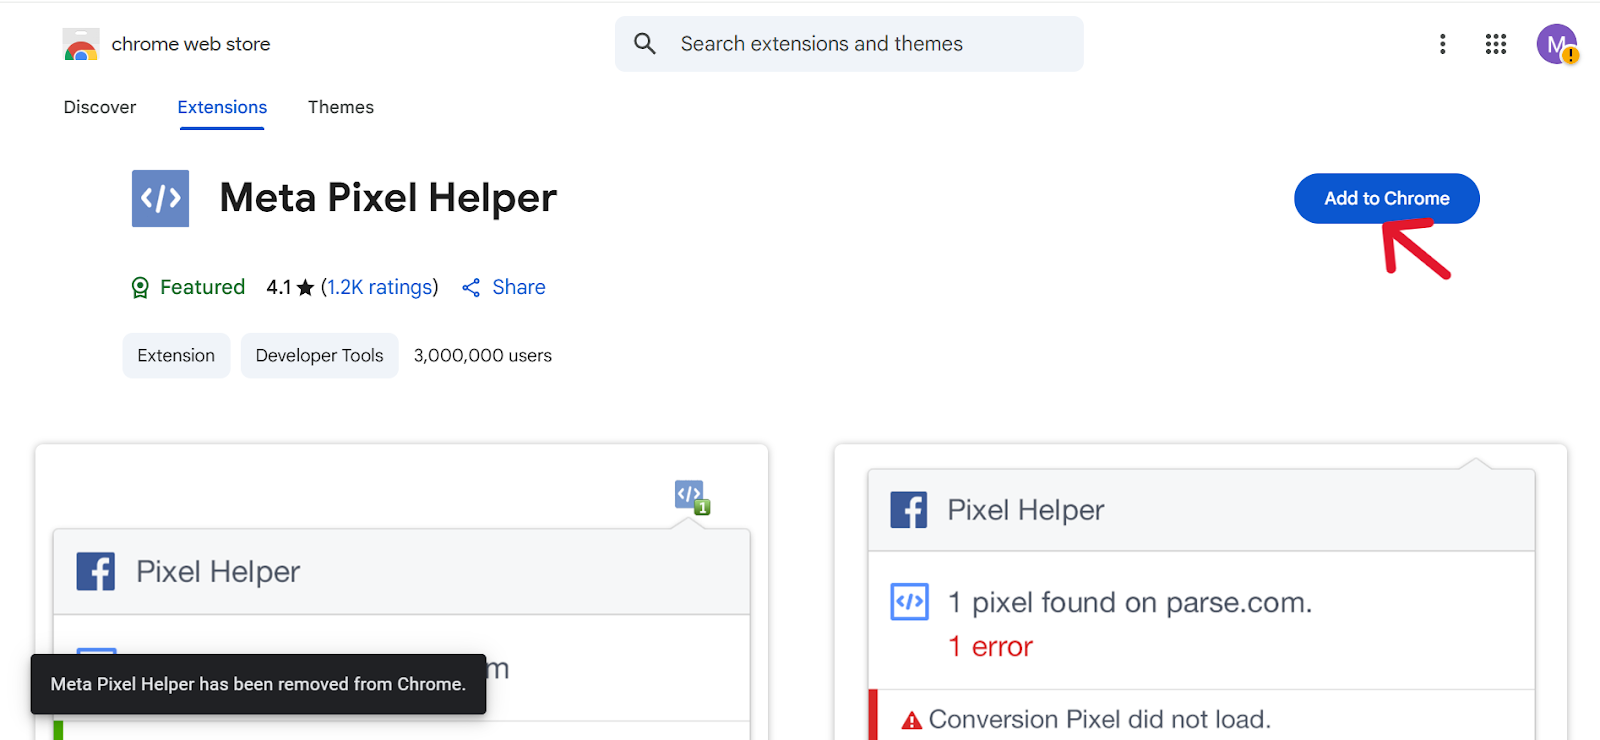
After saving your Meta pixel on Mainstack, use one or more of these methods to verify it is installed correctly:

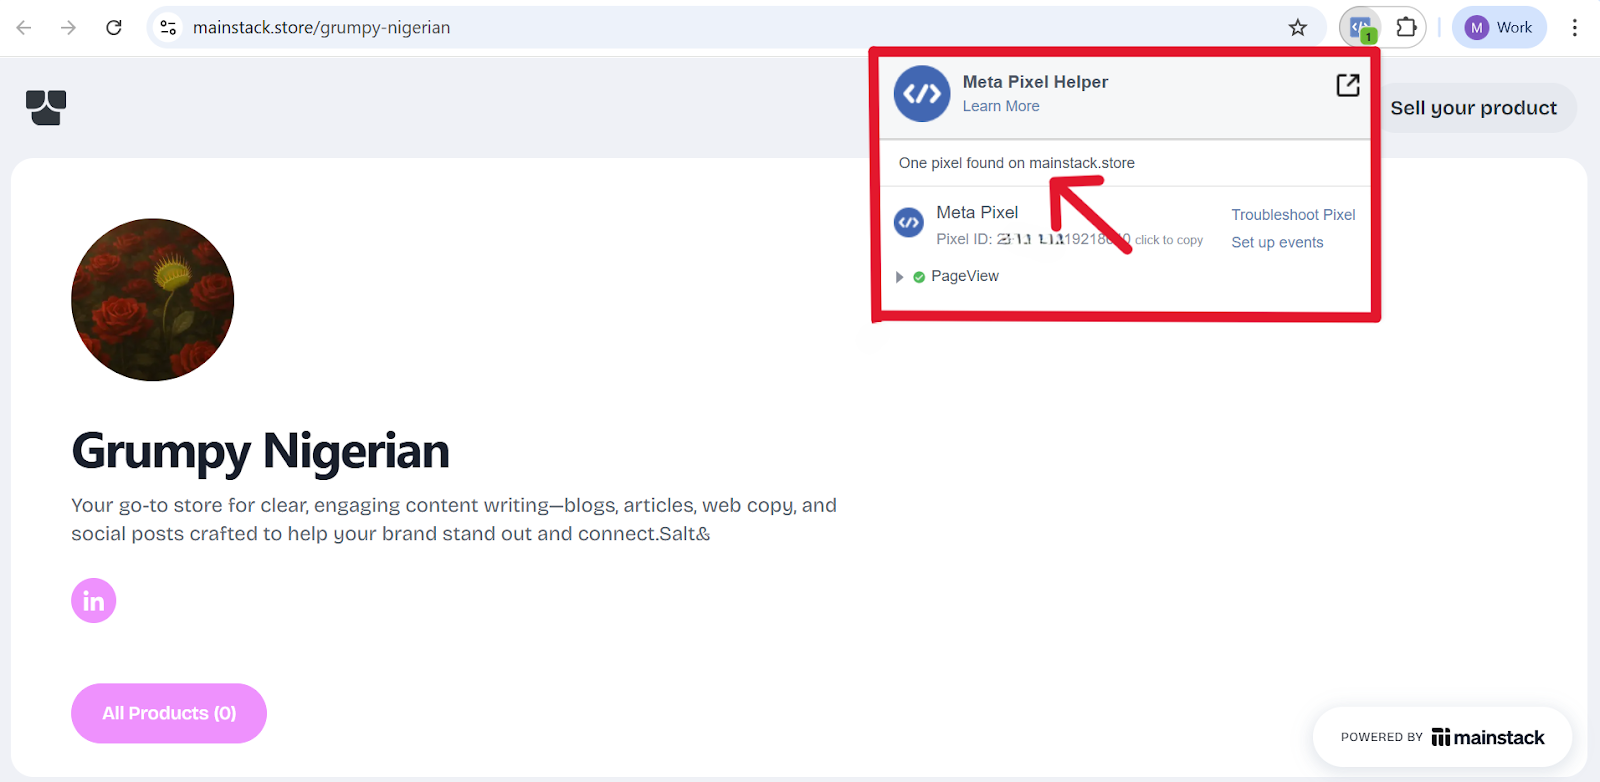
A. Meta Pixel Helper (Chrome extension)

Screenshot of the Meta Pixel Helper Chrome Web Store page with an arrow pointing to the "Add to Chrome" button.

  • Install the Meta Pixel Helper extension, visit your Mainstack page, and click the extension icon.
  • It shows if the Pixel is detected, lists fired events, and flags common problems.

Screenshot of a Mainstack user’s storefront with the Meta Pixel Helper Chrome extension opened, displaying a message that one pixel has been found, confirming successful Meta Pixel integration.

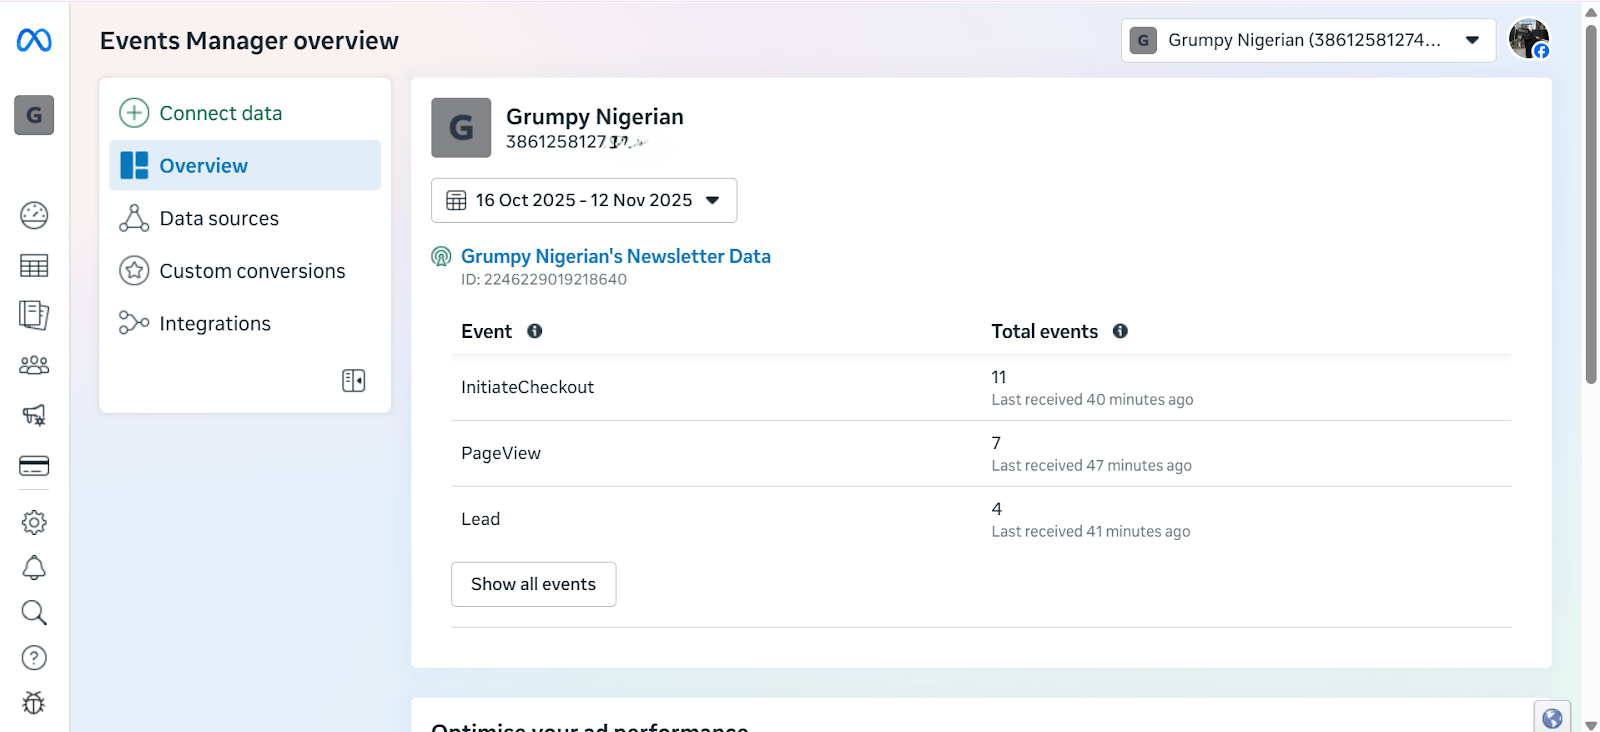
B. Real-time Events in Events Manager

  • Open Overview in Events Manager to see recent activity and Diagnostics to view warnings.
Screenshot of the Facebook Business Events Manager showing the Overview page with Event Analytics displayed, highlighting Pixel activity and analytics for website events.

Start Tracking Smarter with Mainstack

Your growth depends on understanding what works. With Meta Pixel integration on Mainstack, you now have the tools to track, optimize, and scale your marketing effortlessly.

Log in to your Mainstack dashboard today to connect your Meta Pixel and start making data-driven marketing decisions.